
The content calendar has forty topics sitting in a spreadsheet, and every single one of them needs the same tedious sequence before it becomes a published post: open a doc, write a draft, format the headings, write a meta description, log into WordPress, paste everything in, fix the formatting that broke during paste, and finally hit save. Multiply that by forty, and it's easy to see why half the calendar never actually gets written.
This guide builds an automation that handles the repetitive middle part of that process. Add a topic to a content calendar, and a fully formatted article — complete with a meta description — shows up in WordPress as a draft, ready for a human to review, edit, and hit publish. No writing from a blank page, no manual formatting, no copy-paste errors.
This guide's specific technical focus covers two things that catch people off guard the first time they try to connect an automation tool directly to WordPress: how to prove to WordPress that your automation is actually allowed to create posts, and how to send properly formatted HTML content through a JSON request without it breaking along the way.
Every step below is written for someone who has never opened n8n before.
What This Automation Actually Does
Here's the short version before the steps begin:
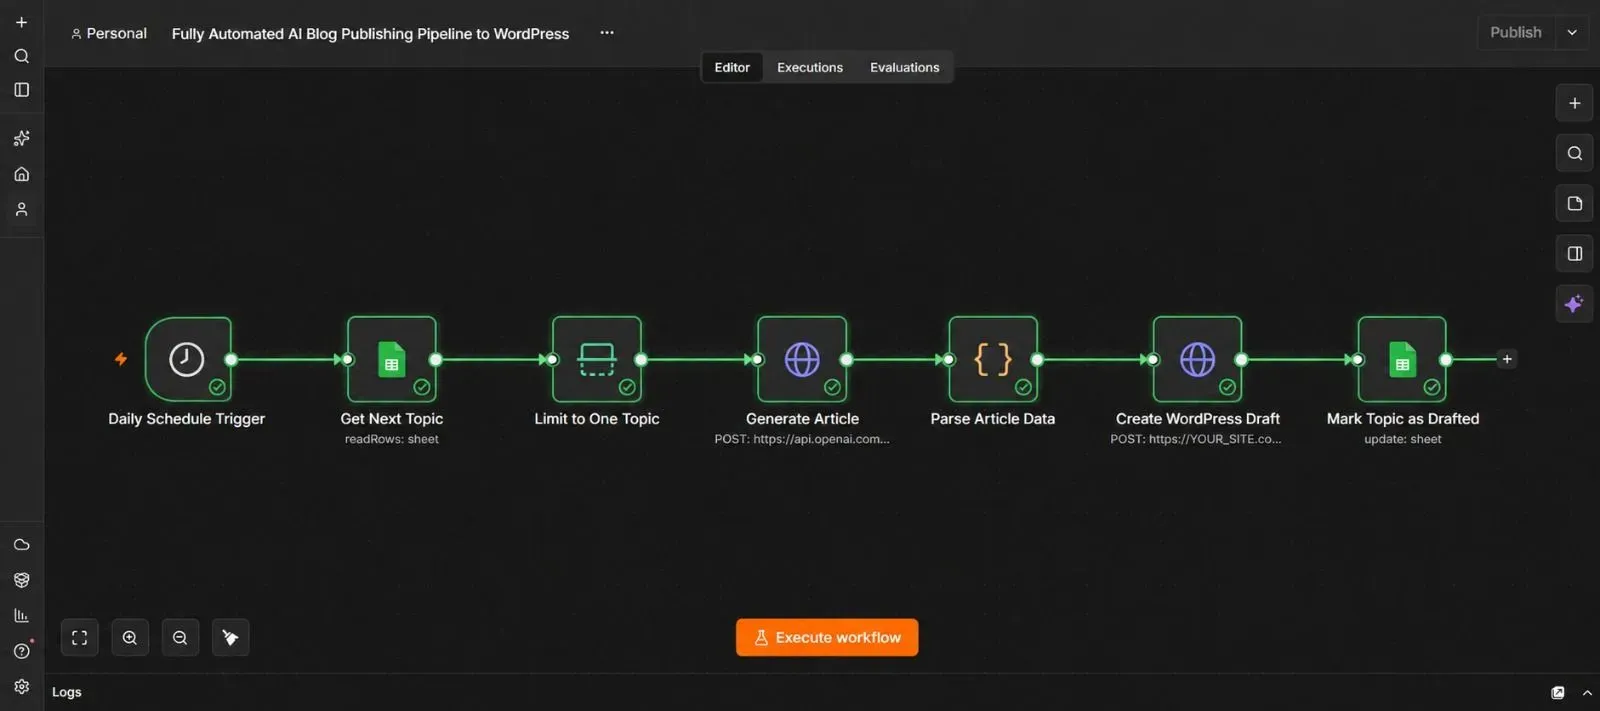
n8n checks a content calendar spreadsheet for the next topic marked as ready → that topic gets sent to an AI model, which writes a full article body in HTML, along with a title and meta description → n8n authenticates with your WordPress site → the finished article gets pushed to WordPress as a Draft post → the spreadsheet gets updated so that topic isn't picked up again.
Why This Guide's Focus Is WordPress Authentication and HTML Handling
This is worth explaining before building anything, since these two details cause the vast majority of first-attempt failures when someone connects an automation tool directly to WordPress.
WordPress doesn't let just anyone create posts on a site by sending it a request. It needs proof that the request is coming from someone with permission. The simplest way to provide that proof, without exposing an actual account password, is something WordPress calls an Application Password — a separate, revocable password generated specifically for this kind of automated access. This guide uses that method because it's the most reliable option that doesn't require installing extra plugins.
The second challenge is that an AI-written article isn't just plain text — it needs actual HTML formatting (paragraph tags, heading tags, bold text, and so on) so WordPress displays it properly instead of dumping one giant unformatted block. But HTML content is full of characters like quotation marks and line breaks that can break a JSON request if they aren't handled correctly on the way there. This guide's approach avoids that problem entirely by having n8n build the request body programmatically, instead of typing it out by hand.
What You'll Need Before You Start
| Requirement | What it's for | Where to get it |
|---|---|---|
| A self-hosted WordPress site (version 5.6 or newer) | Where the drafts get created | Your existing WordPress installation |
| A Google account | Hosts the content calendar spreadsheet | Your existing Google account |
| An n8n instance (Cloud or self-hosted) | Runs the automation | n8n.io |
| An OpenAI API key | Writes the article body and meta description | platform.openai.com |
⚡ A quick but important note: this method requires a self-hosted WordPress site (the kind where you manage your own hosting), since Application Passwords are a feature of WordPress itself. Sites hosted entirely on WordPress.com's own platform handle authentication differently and are outside the scope of this guide.
Step 1 — Create an Application Password in WordPress
- Log into your WordPress admin dashboard.
- Go to Users → Profile (or Users → Your Profile, depending on your WordPress version).
- Scroll down to the Application Passwords section near the bottom of the page.
- Type a name for this password, such as "n8n Blog Pipeline," and click Add New Application Password.
- WordPress will show the generated password exactly once. Copy it immediately and save it somewhere safe — you won't be able to see it again after leaving this page.
💡 This password is not your regular login password, and it can be revoked at any time from this same screen without affecting your normal WordPress login.
Step 2 — Set Up the Content Calendar Spreadsheet
- Open Google Sheets and create a new spreadsheet named something like "Blog Content Calendar."
- Add these column headers in row one: Topic, Status, and Post URL.
- Fill in a few rows under Topic with real article ideas, and set Status to
Readyfor each one you want the automation to pick up. - Leave Post URL empty — this fills in automatically once a draft is created.
Step 3 — Build the Trigger and Pull the Next Ready Topic
- Open a new, blank workflow in n8n.
- Click Add first step, search for "Schedule Trigger," and add it. Set it to run once a day, at whatever time you'd like new drafts generated.
- Click +, search for "Google Sheets," and add it. Name it "Get Next Topic."
- Connect your Google account, select your Blog Content Calendar spreadsheet, set the operation to Get Row(s), and filter for rows where Status equals
Ready. - Add a Limit node right after it, set to 1, so only the first ready topic gets processed each time this runs.
Step 4 — Generate the Article With AI
- Click +, search for "HTTP Request," and add it. Name it "Generate Article."
- Set the method to POST, and the URL to
https://api.openai.com/v1/chat/completions. - Add an Authorization header with the value
Bearer YOUR_OPENAI_API_KEY, and a Content-Type header set toapplication/json. - Turn on Send Body, set it to JSON, and write a system instruction telling the model to respond only in JSON with three fields:
title,meta_description, andcontent_html— withcontent_htmlcontaining the full article body already wrapped in proper HTML tags like<h2>,<p>, and<strong>. - Point the user message at the topic pulled from the spreadsheet:
{{ $json.Topic }}. - Test the step — the response should come back with a title, a short meta description, and a full HTML-formatted article body.
💡 Asking for HTML tags directly inside the AI's response is what makes the rest of this workflow simple. Instead of writing a separate formatting step afterward, the content arrives already structured the way WordPress expects it.
Step 5 — Extract the Fields Cleanly
- Click +, search for "Code," and add it. Name it "Parse Article Data."
- Set the language to JavaScript, and use logic like this:
const rawText = $json.choices[0].message.content;

try {
  const parsed = JSON.parse(rawText);

  return {
    json: {
      title: parsed.title,
      meta_description: parsed.meta_description,
      content_html: parsed.content_html
    }
  };
} catch (error) {
  return {
    json: {
      title: "PARSE ERROR — check raw AI response",
      meta_description: "",
      content_html: rawText
    }
  };
}
💡 This step exists so nothing downstream ever has to dig through the AI's raw response format. If something goes wrong with parsing, the fallback still creates a draft, clearly labeled as needing a manual look, rather than silently failing.
Step 6 — Authenticate and Create the Draft in WordPress
- Click +, search for "HTTP Request," and add it again. Name it "Create WordPress Draft."
- Set the method to POST, and the URL to
https://YOUR_SITE.com/wp-json/wp/v2/posts. - Under Authentication, choose Generic Credential Type, then Basic Auth. Enter your WordPress username and paste in the Application Password from Step 1 as the password.
- Turn on Send Body, set it to JSON, and structure it using n8n's expression editor rather than typing raw JSON by hand:
{
  "title": "={{ $json.title }}",
  "content": "={{ $json.content_html }}",
  "status": "draft",
  "excerpt": "={{ $json.meta_description }}"
}
💡 This is the detail that prevents the HTML-breaking-JSON problem mentioned earlier. Because each field is inserted using n8n's own expression syntax instead of being manually typed and escaped, n8n handles all the special-character escaping automatically behind the scenes — quotation marks, line breaks, and HTML tags all pass through safely without corrupting the request.
- Confirm the status field is set to
"draft"specifically. This is what keeps every generated article sitting safely for review instead of going live automatically. - Test the step — check your WordPress dashboard under Posts → Drafts, and confirm a new draft appeared with the title, formatted content, and excerpt filled in.
Step 7 — Update the Calendar So the Topic Isn't Reused
- Click +, search for "Google Sheets," and add it. Name it "Mark Topic as Drafted."
- Set the operation to Update Row, matching on the Topic column.
- Set Status to
Drafted, and set Post URL to the new post's edit link, using the ID returned from the WordPress step:{{ 'https://YOUR_SITE.com/wp-admin/post.php?post=' + $json.id + '&action=edit' }}. - Test the step, then check the spreadsheet — the row's status should now read
Drafted, with a direct link to review the new post.
Step 8 — Test the Full Chain and Activate
- Make sure at least one row in your spreadsheet is still set to
Ready. - Run the entire workflow manually from the Schedule Trigger node using n8n's Test Step button.
- Confirm a properly formatted draft appears in WordPress, and that the spreadsheet row updates correctly afterward.
- Once everything looks right, click the Active toggle in the top right corner of the canvas.
From here, new topics marked Ready in the calendar get turned into WordPress drafts automatically, on whatever schedule you set in Step 3.
The Downloadable Template
A ready-to-import version of this workflow is included, with clearly labeled placeholders for your WordPress site URL, Application Password, OpenAI API key, and spreadsheet ID.
How to install it:
- Open n8n and start a new, blank workflow.
- Click the three dots menu in the top right corner.
- Select Import from File.
- Choose the downloaded
.jsonfile. - Reconnect your Google Sheets credential, add your OpenAI API key, and update the WordPress URL and Application Password with your own.
{
  "name": "Fully Automated AI Blog Publishing Pipeline to WordPress",
  "nodes": [
    {
      "parameters": {
        "rule": {
          "interval": [
            { "field": "cronExpression", "expression": "0 9 * * *" }
          ]
        }
      },
      "id": "node-schedule-trigger",
      "name": "Daily Schedule Trigger",
      "type": "n8n-nodes-base.scheduleTrigger",
      "typeVersion": 1.2,
      "position": [0, 0]
    },
    {
      "parameters": {
        "operation": "readRows",
        "documentId": { "__rl": true, "value": "YOUR_GOOGLE_SHEET_ID", "mode": "id" },
        "sheetName": { "__rl": true, "value": "Sheet1", "mode": "list" },
        "filtersUI": {
          "values": [
            { "lookupColumn": "Status", "lookupValue": "Ready" }
          ]
        }
      },
      "id": "node-get-next-topic",
      "name": "Get Next Topic",
      "type": "n8n-nodes-base.googleSheets",
      "typeVersion": 4.5,
      "position": [220, 0],
      "credentials": {
        "googleSheetsOAuth2Api": { "id": "1", "name": "Blog Content Calendar" }
      }
    },
    {
      "parameters": {
        "maxItems": 1
      },
      "id": "node-limit-one",
      "name": "Limit to One Topic",
      "type": "n8n-nodes-base.limit",
      "typeVersion": 1,
      "position": [440, 0]
    },
    {
      "parameters": {
        "method": "POST",
        "url": "https://api.openai.com/v1/chat/completions",
        "sendHeaders": true,
        "headerParameters": {
          "parameters": [
            { "name": "Authorization", "value": "Bearer YOUR_OPENAI_API_KEY" },
            { "name": "Content-Type", "value": "application/json" }
          ]
        },
        "sendBody": true,
        "specifyBody": "json",
        "jsonBody": "={{ JSON.stringify({\n  model: \"gpt-4o-mini\",\n  response_format: { type: \"json_object\" },\n  messages: [\n    {\n      role: \"system\",\n      content: \"You are a blog writer. Respond ONLY with JSON: {\\\"title\\\": \\\"...\\\", \\\"meta_description\\\": \\\"...\\\", \\\"content_html\\\": \\\"...\\\"}. content_html must be a complete, well-formatted article using proper HTML tags such as <h2>, <p>, <strong>, and <ul>. meta_description must be under 160 characters.\"\n    },\n    {\n      role: \"user\",\n      content: $json.Topic\n    }\n  ]\n}) }}",
        "options": {
          "timeout": 180000
        }
      },
      "id": "node-generate-article",
      "name": "Generate Article",
      "type": "n8n-nodes-base.httpRequest",
      "typeVersion": 4.2,
      "position": [660, 0]
    },
    {
      "parameters": {
        "language": "javaScript",
        "jsCode": "const rawText = $json.choices[0].message.content;\n\ntry {\n  const parsed = JSON.parse(rawText);\n\n  return {\n    json: {\n      title: parsed.title,\n      meta_description: parsed.meta_description,\n      content_html: parsed.content_html\n    }\n  };\n} catch (error) {\n  return {\n    json: {\n      title: \"PARSE ERROR — check raw AI response\",\n      meta_description: \"\",\n      content_html: rawText\n    }\n  };\n}"
      },
      "id": "node-parse-article",
      "name": "Parse Article Data",
      "type": "n8n-nodes-base.code",
      "typeVersion": 2,
      "position": [880, 0]
    },
    {
      "parameters": {
        "method": "POST",
        "url": "https://YOUR_SITE.com/wp-json/wp/v2/posts",
        "authentication": "genericCredentialType",
        "genericAuthType": "httpBasicAuth",
        "sendBody": true,
        "specifyBody": "json",
        "jsonBody": "={{ JSON.stringify({\n  title: $json.title,\n  content: $json.content_html,\n  status: \"draft\",\n  excerpt: $json.meta_description\n}) }}"
      },
      "id": "node-create-wp-draft",
      "name": "Create WordPress Draft",
      "type": "n8n-nodes-base.httpRequest",
      "typeVersion": 4.2,
      "position": [1100, 0],
      "credentials": {
        "httpBasicAuth": { "id": "5", "name": "WordPress Application Password" }
      }
    },
    {
      "parameters": {
        "operation": "update",
        "documentId": { "__rl": true, "value": "YOUR_GOOGLE_SHEET_ID", "mode": "id" },
        "sheetName": { "__rl": true, "value": "Sheet1", "mode": "list" },
        "matchingColumns": ["Topic"],
        "columns": {
          "mappingMode": "defineBelow",
          "value": {
            "Topic": "={{ $('Get Next Topic').first().json.Topic }}",
            "Status": "Drafted",
            "Post URL": "={{ 'https://YOUR_SITE.com/wp-admin/post.php?post=' + $json.id + '&action=edit' }}"
          }
        }
      },
      "id": "node-mark-drafted",
      "name": "Mark Topic as Drafted",
      "type": "n8n-nodes-base.googleSheets",
      "typeVersion": 4.5,
      "position": [1320, 0],
      "credentials": {
        "googleSheetsOAuth2Api": { "id": "1", "name": "Blog Content Calendar" }
      }
    }
  ],
  "connections": {
    "Daily Schedule Trigger": {
      "main": [[{ "node": "Get Next Topic", "type": "main", "index": 0 }]]
    },
    "Get Next Topic": {
      "main": [[{ "node": "Limit to One Topic", "type": "main", "index": 0 }]]
    },
    "Limit to One Topic": {
      "main": [[{ "node": "Generate Article", "type": "main", "index": 0 }]]
    },
    "Generate Article": {
      "main": [[{ "node": "Parse Article Data", "type": "main", "index": 0 }]]
    },
    "Parse Article Data": {
      "main": [[{ "node": "Create WordPress Draft", "type": "main", "index": 0 }]]
    },
    "Create WordPress Draft": {
      "main": [[{ "node": "Mark Topic as Drafted", "type": "main", "index": 0 }]]
    }
  },
  "pinData": {},
  "meta": {
    "instanceId": "ai-blog-publishing-pipeline-wordpress-template"
  }
}
Common Mistakes to Avoid
- Using your regular WordPress login password instead of an Application Password. WordPress's REST API expects the application-specific password format; a regular account password will typically fail authentication entirely.
- Typing the JSON body for the WordPress request by hand instead of using expressions. Manually pasting HTML content into a raw JSON string is exactly what breaks requests — unescaped quotation marks or line breaks inside the HTML will invalidate the entire body.
- Forgetting to set
statusto"draft". Leaving this out, or setting it to"publish"by mistake, sends AI-generated content live on the site without any human review. - Not limiting the spreadsheet read to one row per run. Without the Limit node from Step 3, every
Readytopic could get processed in a single run, creating far more drafts at once than intended. - Using this on a WordPress.com-hosted site without checking authentication requirements first. Application Passwords work on self-hosted WordPress sites; fully hosted WordPress.com sites often require a different authentication approach.
Frequently Asked Questions
No, not with this setup. Every post is created with status set to draft, so a person still needs to open WordPress, review it, and click Publish.
Yes, with an additional step. You'd generate or select an image, upload it to WordPress's media endpoint first, then reference the returned media ID in the featured_media field of the post-creation request.
Some security plugins restrict or disable REST API access by default. Check that plugin's settings for an option to allow authenticated REST requests, since this workflow depends on that endpoint being reachable.
Yes. Remove the Limit node from Step 3, and every row currently marked Ready will be processed in that same run instead of just the first one.
Treat every draft as a first pass, not a finished article. A human review for accuracy, tone, and any current facts is still an important step before anything goes live.
Leave a Comment
Your comment is completely private and secure. We never publish comments publicly on our website. Your message will be sent directly to our team.