
It's 7:15 AM. You open Notion to check today's plan, but your calendar's already been filling up since yesterday. Three meetings got added overnight. Two client emails came in at 6 AM with "urgent" meeting requests. Your planned time blocks in Notion are completely out of sync with your actual schedule.
By the time you manually update Notion's database to match your calendar, you've already lost thirty minutes and the motivation to actually use your time-blocking system at all.
This guide builds an automation that closes that gap. Every morning at 6 AM—before you even see the first email—n8n reads your Google Calendar, pulls today's events, and automatically updates your Notion time-blocking database. When you open Notion with your coffee, today's schedule is already synced and ready. No manual copy-and-paste, no conflicting information, and no reason to abandon your system halfway through the day.
This guide's specific technical focus covers three things that trip people up: connecting Google Calendar's event data in a format Notion can actually read, handling the date and time conversions that often break synchronization, and building a clean, skippable setup process if you ever need to change your database structure.
Every step below is written for someone who has never opened n8n before and doesn't plan to become an automation expert—just someone who wants their calendar and to-do list to finally agree.
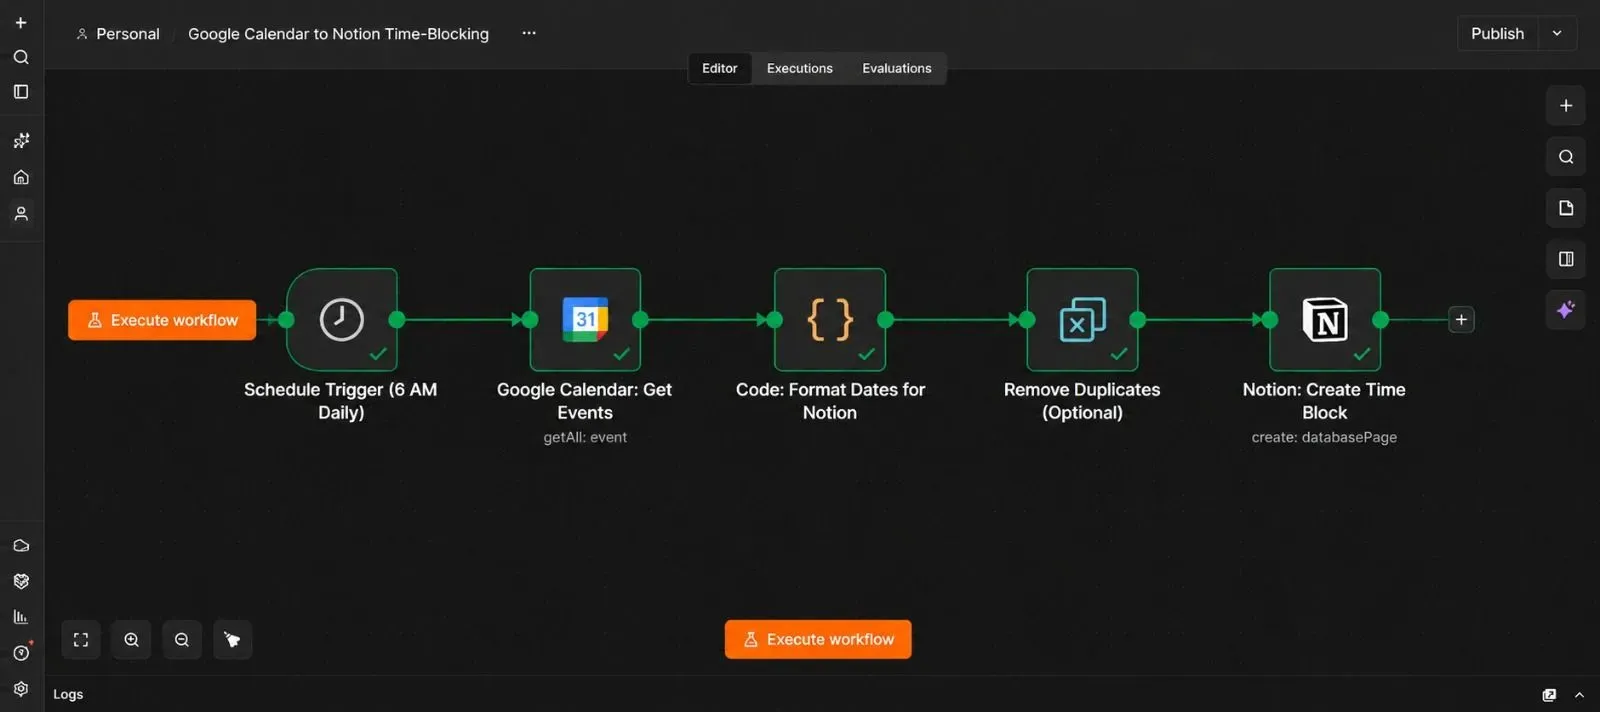
What This Automation Actually Does
Here's the short version before the steps begin:
Every morning at 6 AM, n8n wakes up and checks your Google Calendar → pulls today's events along with start times, end times, and event titles → converts all the date and time information into a format Notion understands → automatically adds or updates each event as a time block in your Notion database → you open Notion to find your entire day already scheduled.
Why This Automation Matters More Than It Sounds
Most people think time-blocking only works if it's perfectly consistent—same system, all information in one place. But if you're using Google Calendar (because it's already syncing with meeting invites) and Notion (because it's where you plan deeper work), your two systems are always fighting each other.
The result: you plan a 2-hour deep work block in Notion, then your 10 AM standup gets added to Google Calendar, and now you either ignore Notion or spend fifteen minutes manually updating both places. By day three, you stop checking Notion entirely.
This automation removes that friction. Your Google Calendar becomes the source of truth (meetings always go there first), and Notion becomes your complete daily view that's automatically current. You get the benefits of both systems without the daily maintenance.
What You'll Need Before You Start
| Requirement | What it's for | Where to get it |
|---|---|---|
| A Google Account with Google Calendar | Your calendar events | Your existing Google account |
| A Notion workspace and database | Where your time blocks sync to | Free at notion.so |
| An n8n instance (Cloud or self-hosted) | Runs the automation | n8n.io (free tier works) |
| 10–15 minutes of setup time | One-time connection setup | Just decide to do this today |
Do you already use Notion? If not, you'll spend about 5 minutes creating a simple database. If you do, this automation works with your existing database—no rebuild needed.
Step 1 — Create a Simple Notion Database (Or Skip If You Have One)
If you already have a Notion database where you track daily tasks or time blocks, skip to Step 2.
If not, here's a quick setup:
- Go to notion.so and log in to your workspace (or create one if this is your first time).
- Click the + icon in the left sidebar to create a new page.
- On the new blank page, type
/databaseand press Enter. A menu appears asking what kind of database you want—click Table. - Name the database something like "Daily Schedule" or "Time Blocks."
- You'll see a table with one column called "Name"—this is where your event titles go. Delete any extra columns you don't need for now. We'll add the time columns in a moment.
Now add the columns that n8n will fill in automatically:
- Click the + icon at the far right of your table to add a new column.
- Name it "Start Time" and set the type to Date. (This stores when the event begins.)
- Click + again and add another column called "End Time," also set to Date.
- Optionally, add one more column called "Event Description" set to Text if you want event details synced too. (This is nice to have, not required.)
You now have everything Notion needs. Don't touch this database again until the automation is running—we'll come back to it in Step 7 to verify data is flowing in.
Step 2 — Get Your Google Calendar Ready
You don't need to do anything special in Google Calendar—n8n will read your calendar as-is. But it's worth knowing which calendar you're syncing.
- Open Google Calendar in your web browser (calendar.google.com).
- On the left sidebar under "My calendars," find the calendar you use for time-blocking. (Usually it's just "Calendar," but if you have multiple calendars, pick the one you check daily.)
- Look for the three dots next to that calendar name and click them. A menu appears.
- Click Settings and sharing.
- Scroll down until you see "Integrate calendar." You'll see a field labeled "Calendar ID." This is a long email-like string (something like
your.email@gmail.comorabc123xyz@group.calendar.google.com). Copy this entire string and save it somewhere safe—you'll paste it into n8n in Step 5.
That's all you need from Google. The calendar is already public enough for n8n to read, and you don't need to create any API keys or tokens manually—n8n handles that when you connect.
Step 3 — Get Your Notion Database Connection Info
n8n needs to know which Notion database to write to. You'll get this info from Notion:
- Open your Notion workspace and go to the Daily Schedule database you created in Step 1.
- Click the Share button in the top right corner of that page.
- A dialog appears. Look for Connections at the bottom. Click Invite to add a connection.
- (If you don't see this option, use a workaround: click the three dots menu ⋯ and look for Add connections or Permissions. Notion's interface varies slightly.)
- When the share menu is open, copy the link to this database. It's the URL in your browser—it should look like:
https://notion.so/your-workspace-name/abc123xyz...Copy the entire URL.
You'll also need your Notion Internal Integration Token, which is a security key that tells n8n "you're allowed to access this workspace":
- Go to notion.so/my-integrations (or navigate to Settings → Integrations → Develop your own).
- Click + New integration if you haven't created one. Name it something like "n8n Calendar Sync."
- After creating it, go to the Secrets tab and copy the Internal Integration Token. (It's a long string starting with
secret_.) Save this somewhere safe. - Back in Notion, go to your Daily Schedule database page, click Share, and under Connections, select the integration you just created. Confirm access.
Step 4 — Start Your n8n Workflow
- Go to n8n.io and log in (or create a free account).
- Click Workflows in the top navigation.
- Click the + New button to create a new workflow.
- Click Add first step in the center of the blank canvas.
Step 5 — Add the Google Calendar Trigger (The Starting Point)
This is the step that tells n8n when to start reading your calendar—in this case, every morning at 6 AM.
- In the "Add first step" dialog, search for "Schedule Trigger" (this sets a time).
- Click Schedule Trigger when it appears.
- A node appears on the canvas with a settings panel on the right. In the settings:
- Set Mode to "Every day"
- Set Hour to 6 (for 6 AM)
- Set Minute to 0
- Leave Timezone set to your local timezone (this ensures it runs at 6 AM in your time, not some random server's time)
- Click Test step to confirm the trigger is set up. You should see a green checkmark if it's working.
Step 6 — Add the Google Calendar Reader (The Event Fetcher)
Now n8n needs to actually read your calendar. This is where your Calendar ID from Step 2 comes in.
- Click the + button below the Schedule Trigger node to add another step.
- Search for "Google Calendar" and click it.
- In the settings panel that appears on the right:
- Under Credentials, click Create new to connect your Google account. (A Google login window will appear—log in with the account that owns the calendar you want to sync.)
- Under Resource, select Event
- Under Operation, select Get All (this tells n8n to grab all events)
- Under Calendar, select your calendar or enter your Calendar ID string.
- Set Order By to "Start Time" (so events appear in chronological order)
- Set Time Min to "Today" and Time Max to "Today" (so you only get today's events, not next week's meetings)
- Click Test step. If everything is connected correctly, you should see a list of today's events appear below the node with titles, start times, and end times.
Step 7 — Add a Code Node to Format Dates (The Converter)
This is the trickiest step, but it's also the most important. Google Calendar stores times in a format that Notion doesn't understand by default, so we need to translate it. The good news: you don't need to write this code yourself—it's provided below, and you just paste it.
- Click the + button below the Google Calendar node to add another step.
- Search for "Code" and click Code.
- A node appears with a large text area. Set Language to JavaScript (it might already be selected).
- Delete any existing code in the text area.
- Copy and paste this entire code block into the text area:
// IMPORTANT: the Google Calendar node already outputs one item PER EVENT,
// not one item containing an "events" array. So we grab all the incoming
// items directly and reformat each one's own event data individually.
const items = $input.all();

return items.map(item => {
  const event = item.json;
  const startDateTime = event.start.dateTime || event.start.date;
  const endDateTime = event.end.dateTime || event.end.date;

  return {
    json: {
      Title: event.summary || "Untitled Event",
      StartTime: new Date(startDateTime).toISOString(),
      EndTime: new Date(endDateTime).toISOString(),
      Description: event.description || "",
      EventLink: event.htmlLink || "",
      EventId: event.id || ""
    }
  };
});
Click Test step. You should see reformatted events appear below with proper date-time formatting.
💡 What this code does (plain English version):
- Takes each individual event item Google Calendar already gave you
- Grabs the event title, start time, end time, and description
- Converts those times into a format Notion understands (ISO format)
- Packages everything up so Notion can read it
- If an event doesn't have a description, it leaves that field blank (no errors)
Step 8 — Clean Up Duplicates Before They Reach Notion (Optional, But Recommended)
This step needs to happen before the Notion node, not after — and that order actually matters, so it's worth explaining why.
⚠️ Why order matters here: a duplicate-removal step only filters the items passing through it — it can't undo something an earlier step already did. If you add it after the Notion node, Notion has already created a page for every event, duplicates included, before the dedupe step ever runs. By that point, deduplicating is pointless. Placing it here, right after the Code node and before Notion, is what actually stops a duplicate from ever becoming a Notion page in the first place.
This particular step protects against Google Calendar occasionally handing back the same event twice within one run (uncommon, but it happens). It does not prevent an event from being re-added on a different day — see the FAQ below for why, and what a full day-to-day duplicate check would require.
- Click the + button below the Code node to add another step.
- Search for "Remove Duplicates".
- In the settings panel:
- Set Operation to "Remove Items Repeated in Current Input."
- Set Compare to "Selected Fields."
- Under Fields to Compare, type Title.
- Click Test step. You should see the same list of events pass through.
Step 9 — Connect to Your Notion Database (The Destination)
Now n8n needs to know where to send all this data. This is where your Notion Internal Integration Token and database URL from Step 3 come in.
- Click the + button below the Remove Duplicates node to add another step.
- Search for "Notion" and click Notion.
- In the settings panel on the right:
- Under Credentials, connect your Notion account using your Internal Integration Token (starting with
secret_). - Set Resource to "Database Page"
- Set Operation to "Create"
- Under Database, select your "Daily Schedule" database.
- Under Credentials, connect your Notion account using your Internal Integration Token (starting with
- Under Properties, map the fields:
- Page Title →
{{ $json.Title }} - "Start Time" →
{{ $json.StartTime }} - "End Time" →
{{ $json.EndTime }} - "Event Description" →
{{ $json.Description }}
- Page Title →
- Click Test step. You should see a green checkmark and an event created in Notion.
Step 10 — Test the Entire Workflow
Before activating, make sure everything runs smoothly end-to-end:
- Click the Test Workflow button.
- Watch all five nodes complete with green checkmarks.
- Open your Notion database to confirm the time block entries are populated.
Step 11 — Activate the Workflow
Flip the workflow toggle in the top right corner to Active / On so it runs automatically every morning at 6 AM.
The Downloadable Template
A ready-to-import version of this workflow is included below. It includes correct node definitions and pre-wired connections.
{
  "name": "Google Calendar to Notion Time-Blocking",
  "nodes": [
    {
      "parameters": {
        "rule": {
          "interval": [
            {
              "field": "days",
              "triggerAtHour": 6,
              "triggerAtMinute": 0
            }
          ]
        }
      },
      "id": "a1b2c3d4-1111-2222-3333-444455556666",
      "name": "Schedule Trigger (6 AM Daily)",
      "type": "n8n-nodes-base.scheduleTrigger",
      "typeVersion": 1.2,
      "position": [0, 0],
      "credentials": {}
    },
    {
      "parameters": {
        "resource": "event",
        "operation": "getAll",
        "calendar": {
          "__rl": true,
          "value": "YOUR_CALENDAR_ID",
          "mode": "list"
        },
        "returnAll": true,
        "options": {
          "timeMin": "={{ $now.startOf('day').toISO() }}",
          "timeMax": "={{ $now.endOf('day').toISO() }}",
          "orderBy": "startTime",
          "singleEvents": true,
          "showDeleted": false
        }
      },
      "id": "a1b2c3d4-2222-3333-4444-555556666777",
      "name": "Google Calendar: Get Events",
      "type": "n8n-nodes-base.googleCalendar",
      "typeVersion": 1,
      "position": [220, 0],
      "credentials": {}
    },
    {
      "parameters": {
        "language": "javaScript",
        "jsCode": "// The Google Calendar node already outputs ONE ITEM PER EVENT,\n// so there is no wrapping \"events\" or \"items\" array to dig into here.\n// Each item's own .json IS the event object.\nconst items = $input.all();\n\nreturn items.map(item => {\n  const event = item.json;\n  const startDateTime = event.start.dateTime || event.start.date;\n  const endDateTime = event.end.dateTime || event.end.date;\n\n  return {\n    json: {\n      Title: event.summary || \"Untitled Event\",\n      StartTime: new Date(startDateTime).toISOString(),\n      EndTime: new Date(endDateTime).toISOString(),\n      Description: event.description || \"\",\n      EventLink: event.htmlLink || \"\",\n      EventId: event.id || \"\"\n    }\n  };\n});"
      },
      "id": "a1b2c3d4-3333-4444-5555-666677778888",
      "name": "Code: Format Dates for Notion",
      "type": "n8n-nodes-base.code",
      "typeVersion": 2,
      "position": [440, 0],
      "credentials": {}
    },
    {
      "parameters": {
        "operation": "removeItemsRepeatedInCurrentInput",
        "compare": "selectedFields",
        "fieldsToCompare": "Title",
        "options": {}
      },
      "id": "a1b2c3d4-4444-5555-6666-777788889999",
      "name": "Remove Duplicates (Optional)",
      "type": "n8n-nodes-base.removeDuplicates",
      "typeVersion": 2,
      "position": [660, 0],
      "credentials": {}
    },
    {
      "parameters": {
        "resource": "databasePage",
        "operation": "create",
        "databaseId": {
          "__rl": true,
          "value": "YOUR_NOTION_DATABASE_ID",
          "mode": "id"
        },
        "title": "={{ $json.Title }}",
        "propertiesUi": {
          "propertyValues": [
            {
              "key": "Start Time",
              "type": "date",
              "date": "={{ $json.StartTime }}"
            },
            {
              "key": "End Time",
              "type": "date",
              "date": "={{ $json.EndTime }}"
            },
            {
              "key": "Event Description",
              "type": "rich_text",
              "textContent": "={{ $json.Description }}"
            }
          ]
        }
      },
      "id": "a1b2c3d4-5555-6666-7777-888899990000",
      "name": "Notion: Create Time Block",
      "type": "n8n-nodes-base.notion",
      "typeVersion": 2.2,
      "position": [880, 0],
      "credentials": {}
    }
  ],
  "connections": {
    "Schedule Trigger (6 AM Daily)": {
      "main": [
        [
          {
            "node": "Google Calendar: Get Events",
            "type": "main",
            "index": 0
          }
        ]
      ]
    },
    "Google Calendar: Get Events": {
      "main": [
        [
          {
            "node": "Code: Format Dates for Notion",
            "type": "main",
            "index": 0
          }
        ]
      ]
    },
    "Code: Format Dates for Notion": {
      "main": [
        [
          {
            "node": "Remove Duplicates (Optional)",
            "type": "main",
            "index": 0
          }
        ]
      ]
    },
    "Remove Duplicates (Optional)": {
      "main": [
        [
          {
            "node": "Notion: Create Time Block",
            "type": "main",
            "index": 0
          }
        ]
      ]
    }
  },
  "pinData": {},
  "settings": {
    "executionOrder": "v1"
  },
  "staticData": null,
  "tags": [],
  "meta": {
    "instanceId": "google-calendar-notion-timeblocking-template-v2"
  }
}
Common Mistakes to Avoid (And How to Fix Them)
- "A node shows a broken image or question mark icon and has no connection handles." This occurs when an imported JSON specifies a
typeVersionor internal name that n8n does not recognize (for example, assigningtypeVersion: 2.2to the Google Calendar node instead of1). n8n cannot load the node specification, meaning connection handles and icons cannot render. Re-import the verified template above. - "My events aren't appearing in Notion." The most common cause is the Google Calendar ID is slightly wrong. Re-copy your Calendar ID from Google Calendar settings and paste it directly into the Google Calendar node.
- "The automation runs at the wrong time." Make sure the Timezone setting in the Schedule Trigger (Step 5) matches your actual timezone.
- "My Code node fails with 'Cannot read properties of undefined.'" Ensure your Code node uses
$input.all()instead of referencing a non-existent$json.eventsarray.
Frequently Asked Questions
No. n8n's Cloud version runs on cloud servers 24/7. If you self-host on your own computer or VPS, your server must remain active for the 6 AM schedule trigger to fire.
This happens when an imported workflow file has an unsupported typeVersion tag (like 2.2 on Google Calendar). In n8n, Google Calendar runs on version 1. When an invalid version is imported, n8n treats it as an unknown node and cannot draw input/output handles. The current downloadable template fixes this issue.
Leave a Comment
Your comment is completely private and secure. We never publish comments publicly on our website. Your message will be sent directly to our team.