
A customer has a great experience with your business and forgets to ever mention it anywhere public. Another customer has one small problem, gets frustrated nobody followed up, and leaves a two-star Google review the same night. Over time, that pattern quietly drags your public rating down — not because your service is bad, but because only the upset customers had a reason to speak up.
This guide builds an automation that fixes the timing problem behind that pattern. Seven days after a purchase, it emails a short feedback form. If the customer rates the experience 4 or 5 stars, it follows up with a direct link to leave a Google review. If they rate it 1 to 3 stars, it skips the public review request entirely and creates an urgent internal support ticket instead, so someone can fix the problem before the customer feels like Google is their only option.
Everything below is explained step by step for someone who has never used n8n before — including the specific tutorial focus of this guide: setting up routing logic with n8n's Switch node based on numerical values, which is the part most people get stuck on.
A Quick Compliance Note Before You Build This
This pattern — asking happy customers for a public review while routing unhappy ones somewhere private — is common, but Google specifically discourages the version where a business only ever surfaces a public review link to customers it already knows had a positive experience. Google refers to this as review gating, and it's flagged in their guidelines as manipulating which reviews reach the public.
This doesn't mean the workflow is useless — the internal support-ticket half of it (catching unhappy customers fast) is entirely fine and genuinely valuable on its own. If you want to stay clearly within Google's guidelines, the safer version of this automation still asks every customer if they'd like to leave a public review, and uses the star rating only to decide how quickly and personally your team follows up — not whether the review request happens at all. This guide notes where that adjustment fits in case you'd rather build the fully compliant version.
What This Automation Actually Does
Here's the short version before the steps begin. It runs as two connected n8n workflows:
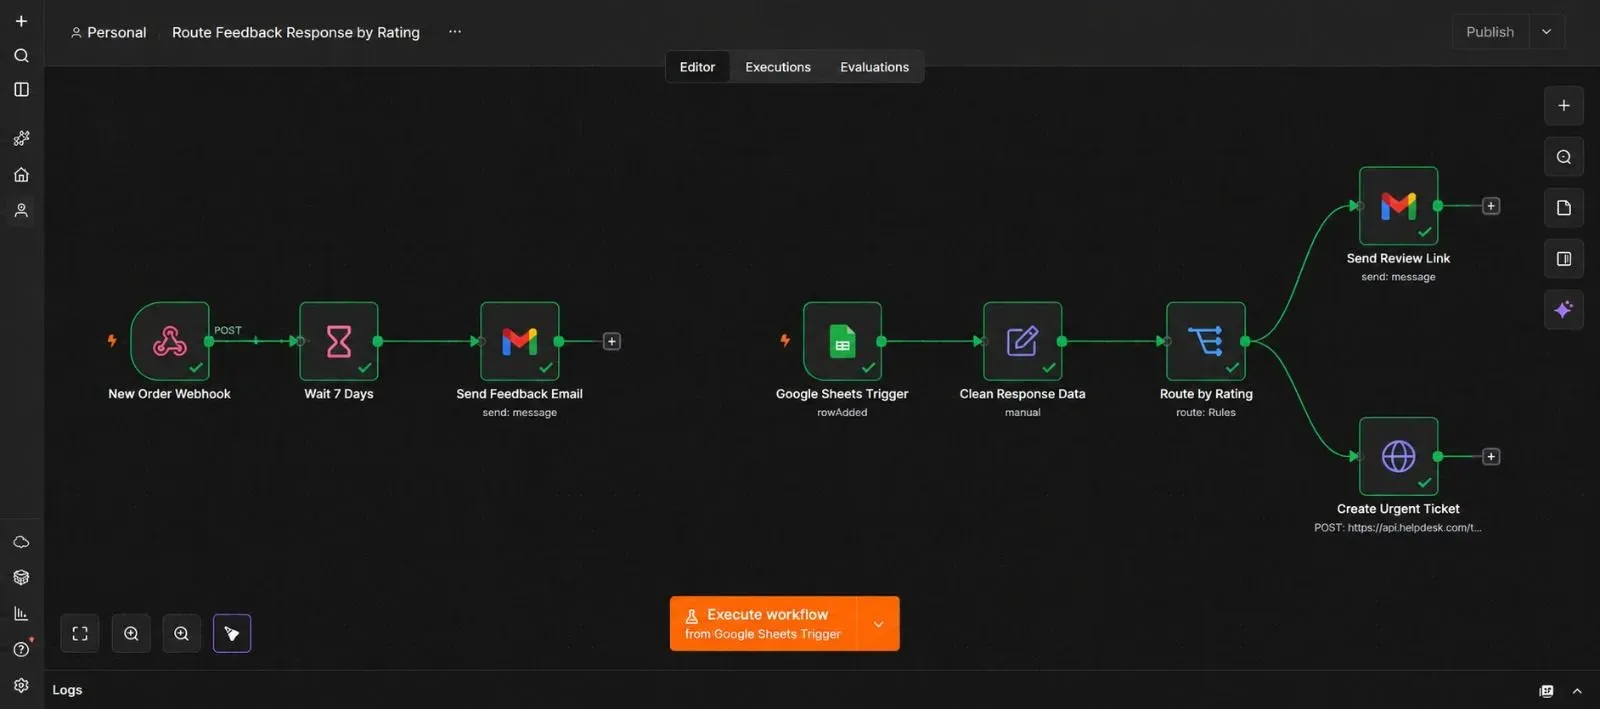
Workflow 1 — Send the Feedback Request: a new order comes in → n8n waits exactly 7 days → n8n emails the customer a short feedback form.
Workflow 2 — Route the Response: the customer submits the form → n8n reads their star rating → a number from 4 to 5 sends a Google review link → a number from 1 to 3 creates an urgent internal support ticket instead.
What You'll Need Before You Start
| Requirement | What it's for | Where to get it |
|---|---|---|
| An online store with order webhooks (Shopify used in this guide) | Tells n8n when a purchase happens | Your existing Shopify admin |
| An n8n instance (Cloud or self-hosted) | Runs both workflows | n8n.io |
| A Google account | Hosts the feedback form and response sheet | Your existing Google account |
| An email-sending credential (Gmail or SMTP) | Sends the feedback and review-link emails | Your existing email provider |
| Your Google Business Profile review link | Where happy customers get sent | Google Business Profile → Ask for reviews |
| A support board (Trello used in this guide) | Where urgent tickets land | trello.com, or swap in your own helpdesk tool |
Step 1 — Build the Feedback Form
- Go to forms.google.com and click the blank form option.
- Add one question: "How would you rate your recent purchase?" — set the question type to Linear Scale, from 1 to 5.
- Add a second, optional question: "Anything you'd like us to know?" as a short paragraph field.
- Turn on Collect email addresses under the form's Settings, so you know which customer left which rating.
- Click the Responses tab, then click the green Sheets icon to Create a new spreadsheet for the answers.
Step 2 — Get Your Google Business Profile Review Link
- Go to business.google.com, and open your business profile.
- Find the Get more reviews or Ask for reviews option.
- Copy the short link Google generates — this is what happy customers will receive.
Step 3 — Trigger Workflow 1 When an Order Is Placed
- In your Shopify admin, go to Settings → Notifications, and scroll to Webhooks.
- Click Create webhook, set the event to Order creation, and set the format to JSON.
- In n8n, open a new blank workflow, click Add first step, search for "Webhook," and add it.
- Set the method to POST and the path to something recognizable, like
new-order. - Copy the Production URL from this node and paste it into Shopify's webhook URL field, then save.
- Name this workflow "Send Feedback Request."
Step 4 — Wait 7 Days Before Asking for Feedback
- Click + after the Webhook node, search for "Wait," and add it.
- Set the amount to 7 and the unit to Days.
This single node is what turns "email everyone right away" into "email everyone exactly a week later," without needing a separate scheduling system.
Step 5 — Send the Feedback Email
- Click +, search for "Gmail" (or "Send Email" if you're using SMTP instead), and add it.
- Connect your email credential.
- Set the To field to the customer's email address from the order data.
- Set a subject like "How did we do?"
- In the body, include a short, friendly message and a link to your feedback form from Step 1. If you want the response sheet to automatically know which order this reply belongs to, add the customer's email as a pre-filled URL parameter on the form link.
- Test the step using a sample order to confirm the email arrives correctly.
At this point, Workflow 1 is done. Save it, and switch the Active toggle on in the top right corner.
Step 6 — Start Workflow 2 When a Response Comes In
- Open a new, blank workflow, and name it "Route Feedback Response."
- Click Add first step, search for "Google Sheets Trigger," and add it.
- Connect your Google account, select the spreadsheet created in Step 1, and select the responses sheet/tab.
- Set the trigger event to On Row Added, and set a poll interval (checking every few minutes is usually enough).
Step 7 — Clean Up the Response Data
Google Sheets sometimes stores numbers as text rather than actual numbers, which causes a routing problem later if it's not fixed here.
- Click +, search for "Edit Fields (Set)," and add it.
- Create a field called
rating, and set its type explicitly to Number — not just drag in the raw value, but convert it. In the value, wrap the sheet's rating column with a number conversion, for example:{{ Number($json['How would you rate your recent purchase?']) }} - Add a field called
email, pulling in the respondent's email address. - Add a field called
comments, pulling in the second question's answer. - Test the step, and confirm the
ratingfield shows as an actual number, not text with quotes around it.
This step matters more than it looks. If rating stays as text, a rule like "greater than or equal to 4" can behave unpredictably — text comparisons don't always sort the way you'd expect.
Step 8 — Build the Routing Logic With a Switch Node
This is the core focus of this guide, so here's exactly how it works and why the order of your rules matters.
- Click +, search for "Switch," and add it. Name it "Route by Rating."
- Set Mode to Rules.
- Create your first rule:
ratingis greater than or equal to4. Route this to output "Happy Customer." - Create your second rule:
ratingis greater than or equal to1. Route this to output "Unhappy Customer." - Leave the fallback output connected to nothing, or route it to a simple logging step — this catches blank or invalid ratings that don't match either rule, so a broken response doesn't silently vanish without anyone noticing.
💡 Why the order of these two rules matters: n8n's Switch node checks rules from top to bottom and stops at the very first one that matches. Because a rating of 5 is also technically "greater than or equal to 1," if you placed the "greater than or equal to 1" rule first, every single rating — including 5-star ones — would match that rule first and never reach the "greater than or equal to 4" rule below it. Putting the narrower, more specific condition (4 and up) first is what makes this work correctly.
Step 9 — Happy Customers: Send the Review Link
- After the "Happy Customer" output, add a Gmail (or Send Email) node.
- Set the To field to the customer's
email. - Write a short thank-you message and include your Google Business Profile review link from Step 2.
- Test the step with a sample rating of 5 to confirm the email sends correctly.
(If you'd rather build the fully policy-compliant version described in the compliance note above, this is the step to adjust — instead of only happy customers receiving a review link, every customer gets one, and this branch instead controls things like a personalized thank-you or a small loyalty offer.)
Step 10 — Unhappy Customers: Create an Urgent Support Ticket
- After the "Unhappy Customer" output, add an HTTP Request node, named "Create Urgent Ticket."
- Set the method to POST, and the URL to
https://api.trello.com/1/cards. - Add query parameters for your Trello key, token, and the idList of your support board's urgent list.
- Add body fields:
name→ something likeUrgent: Low rating from {{ $json.email }}desc→ include theratingandcommentsfields so the support team has full context immediately
- Test the step with a sample rating of 2, and confirm the card appears on your Trello board.
Step 11 — Test the Whole Chain End to End
- Manually trigger Workflow 1 with a test order, or temporarily shorten the Wait node to a few minutes while testing.
- Fill out the feedback form yourself with a 5-star rating, and confirm the review-link email arrives.
- Fill it out again with a 2-star rating, and confirm the urgent Trello card appears instead.
- Once both paths work correctly, set the Wait node back to 7 days if you changed it for testing.
Step 12 — Activate Both Workflows
- Open each workflow and click the Active toggle in the top right corner.
- Confirm both switch on.
From here, every new order automatically gets a feedback request a week later, and every response automatically routes itself to the right place — no one on your team has to remember to follow up.
The Downloadable Templates
Two ready-to-import n8n workflow files are included below — one for each half of this automation — with clearly labeled placeholders for your own credentials, links, and board IDs.
How to install them:
- Open n8n and start a new, blank workflow.
- Click the three dots menu in the top right corner.
- Select Import from File.
- Choose the downloaded
.jsonfile. - Repeat for the second file, then connect your own Shopify, Google, and Trello credentials where the placeholders appear.
{
  "name": "Send Feedback Request (7 Days After Purchase)",
  "nodes": [
    {
      "parameters": {
        "httpMethod": "POST",
        "path": "new-order",
        "responseMode": "onReceived",
        "options": {}
      },
      "id": "node-order-webhook",
      "name": "New Order Webhook",
      "type": "n8n-nodes-base.webhook",
      "typeVersion": 2,
      "position": [0, 0]
    },
    {
      "parameters": { "amount": 7, "unit": "days" },
      "id": "node-wait-7-days",
      "name": "Wait 7 Days",
      "type": "n8n-nodes-base.wait",
      "typeVersion": 1.1,
      "position": [220, 0]
    },
    {
      "parameters": {
        "sendTo": "={{ $json.body.customer.email }}",
        "subject": "How did we do?",
        "message": "Hi {{ $json.body.customer.first_name }},<br><br>We'd love to hear how your recent order went. It only takes a minute:<br><br><a href=\"YOUR_GOOGLE_FORM_LINK?prefill_email={{ $json.body.customer.email }}\">Leave quick feedback</a><br><br>Thanks for shopping with us!",
        "options": {}
      },
      "id": "node-send-feedback-email",
      "name": "Send Feedback Email",
      "type": "n8n-nodes-base.gmail",
      "typeVersion": 2.1,
      "position": [440, 0],
      "credentials": {
        "gmailOAuth2": {
          "id": "1",
          "name": "Store Gmail"
        }
      }
    }
  ],
  "connections": {
    "New Order Webhook": {
      "main": [[{ "node": "Wait 7 Days", "type": "main", "index": 0 }]]
    },
    "Wait 7 Days": {
      "main": [[{ "node": "Send Feedback Email", "type": "main", "index": 0 }]]
    }
  },
  "pinData": {},
  "meta": {
    "instanceId": "send-feedback-request-template"
  }
}
{
  "name": "Route Feedback Response by Rating",
  "nodes": [
    {
      "parameters": {
        "event": "rowAdded",
        "documentId": { "__rl": true, "value": "YOUR_GOOGLE_SHEET_ID", "mode": "id" },
        "sheetName": { "__rl": true, "value": "Form Responses 1", "mode": "name" },
        "options": { "pollTimes": { "item": [{ "mode": "everyMinute" }] } }
      },
      "id": "node-sheets-trigger",
      "name": "Google Sheets Trigger",
      "type": "n8n-nodes-base.googleSheetsTrigger",
      "typeVersion": 1,
      "position": [0, 0],
      "credentials": {
        "googleSheetsOAuth2Api": {
          "id": "2",
          "name": "Store Google Account"
        }
      }
    },
    {
      "parameters": {
        "assignments": {
          "assignments": [
            {
              "id": "s1",
              "name": "rating",
              "value": "={{ Number($json['How would you rate your recent purchase?']) }}",
              "type": "number"
            },
            {
              "id": "s2",
              "name": "email",
              "value": "={{ $json['Email Address'] }}",
              "type": "string"
            },
            {
              "id": "s3",
              "name": "comments",
              "value": "={{ $json[\"Anything you'd like us to know?\"] }}",
              "type": "string"
            }
          ]
        },
        "options": {}
      },
      "id": "node-clean-response",
      "name": "Clean Response Data",
      "type": "n8n-nodes-base.set",
      "typeVersion": 3.4,
      "position": [220, 0]
    },
    {
      "parameters": {
        "mode": "rules",
        "rules": {
          "values": [
            {
              "conditions": {
                "conditions": [
                  { "leftValue": "={{ $json.rating }}", "rightValue": 4, "operator": { "type": "number", "operation": "gte" } }
                ]
              },
              "outputKey": "Happy Customer"
            },
            {
              "conditions": {
                "conditions": [
                  { "leftValue": "={{ $json.rating }}", "rightValue": 1, "operator": { "type": "number", "operation": "gte" } }
                ]
              },
              "outputKey": "Unhappy Customer"
            }
          ]
        },
        "fallbackOutput": "none",
        "options": {}
      },
      "id": "node-route-by-rating",
      "name": "Route by Rating",
      "type": "n8n-nodes-base.switch",
      "typeVersion": 3.2,
      "position": [440, 0]
    },
    {
      "parameters": {
        "sendTo": "={{ $json.email }}",
        "subject": "Thanks for your feedback!",
        "message": "Thanks so much for the great rating! If you have a moment, we'd really appreciate a quick review here:<br><br><a href=\"YOUR_GOOGLE_BUSINESS_REVIEW_LINK\">Leave a Google review</a>",
        "options": {}
      },
      "id": "node-send-review-link",
      "name": "Send Review Link",
      "type": "n8n-nodes-base.gmail",
      "typeVersion": 2.1,
      "position": [660, -160],
      "credentials": {
        "gmailOAuth2": {
          "id": "1",
          "name": "Store Gmail"
        }
      }
    },
    {
      "parameters": {
        "method": "POST",
        "url": "https://api.trello.com/1/cards",
        "sendQuery": true,
        "queryParameters": {
          "parameters": [
            { "name": "key", "value": "YOUR_TRELLO_API_KEY" },
            { "name": "token", "value": "YOUR_TRELLO_API_TOKEN" },
            { "name": "idList", "value": "YOUR_URGENT_SUPPORT_LIST_ID" }
          ]
        },
        "sendBody": true,
        "contentType": "form-urlencoded",
        "bodyParameters": {
          "parameters": [
            { "name": "name", "value": "={{ 'Urgent: Low rating from ' + $json.email }}" },
            { "name": "desc", "value": "={{ 'Rating: ' + $json.rating + '\\nComments: ' + $json.comments }}" }
          ]
        }
      },
      "id": "node-create-urgent-ticket",
      "name": "Create Urgent Ticket",
      "type": "n8n-nodes-base.httpRequest",
      "typeVersion": 4.2,
      "position": [660, 160]
    }
  ],
  "connections": {
    "Google Sheets Trigger": {
      "main": [[{ "node": "Clean Response Data", "type": "main", "index": 0 }]]
    },
    "Clean Response Data": {
      "main": [[{ "node": "Route by Rating", "type": "main", "index": 0 }]]
    },
    "Route by Rating": {
      "main": [
        [{ "node": "Send Review Link", "type": "main", "index": 0 }],
        [{ "node": "Create Urgent Ticket", "type": "main", "index": 0 }]
      ]
    }
  },
  "pinData": {},
  "meta": {
    "instanceId": "route-feedback-response-template"
  }
}
Common Mistakes to Avoid
- Leaving the rating field as text. This is the single most common reason a "greater than or equal to" rule silently fails to match anything.
- Putting the broader rule before the narrower one. As explained in Step 8, this causes every rating to fall into the first matching branch instead of the correct one.
- Skipping the fallback output. A blank or malformed rating should still be visible somewhere, not disappear without a trace.
- Forgetting to reset the Wait node after testing. It's easy to shorten it to a few minutes for testing and forget to change it back to 7 days.
- Only ever asking happy customers for public reviews. As covered in the compliance note near the top, this specific pattern is against Google's review guidelines — consider the adjustment mentioned in Step 9 if this matters for your business.
Frequently Asked Questions
A Switch node keeps all your rating ranges in one place and evaluates them in a clear top-to-bottom order, which is easier to read and adjust later than chaining multiple IF nodes together.
Nothing happens automatically in this version — Workflow 2 only runs when a new row appears in the response sheet. If you want a reminder for non-responders, that would need a separate scheduled check comparing your orders list against your responses sheet.
Yes. Add a third rule to the Switch node — for example, exactly equal to 3 routed to its own "Neutral" branch — placed between the two existing rules, since Switch node order still applies.
No. Swap the HTTP Request in Step 10 for whichever ticketing system or helpdesk you already use — the routing logic before it doesn't need to change.
No. n8n's Wait node doesn't keep a process running the whole time — it pauses the specific execution efficiently and resumes it automatically once the wait period ends.
Leave a Comment
Your comment is completely private and secure. We never publish comments publicly on our website. Your message will be sent directly to our team.