
A person fills out your Facebook lead form at 9:14 AM. Your sales team doesn't check the Facebook Ads dashboard until lunch. By the time anyone calls that lead back, they've already filled out three of your competitors' forms too, and the one who replies first usually wins the sale.
This guide fixes that gap. You'll build an automation in n8n that does two things the moment a lead submits your Facebook form:
- Saves the lead's details into your own MySQL database, so you own that data permanently instead of relying only on Facebook's dashboard.
- Sends an instant SMS to your sales team (or the lead's assigned rep) so someone can follow up within minutes, not hours.
Everything below is written for someone who has never opened n8n before. Each step tells you exactly what to click, what to type, and where a screenshot belongs so you don't lose track of where you are.
What This Automation Actually Does
Here's the short version before we get into the clicks:
Facebook sends n8n a signal the second someone submits your lead form → n8n asks Facebook for that lead's full details (name, email, phone, and any custom questions you added) → n8n writes that data into a MySQL table → n8n immediately sends an SMS to a phone number of your choice.
The whole chain usually finishes in a few seconds, well before a human would have even opened their inbox.
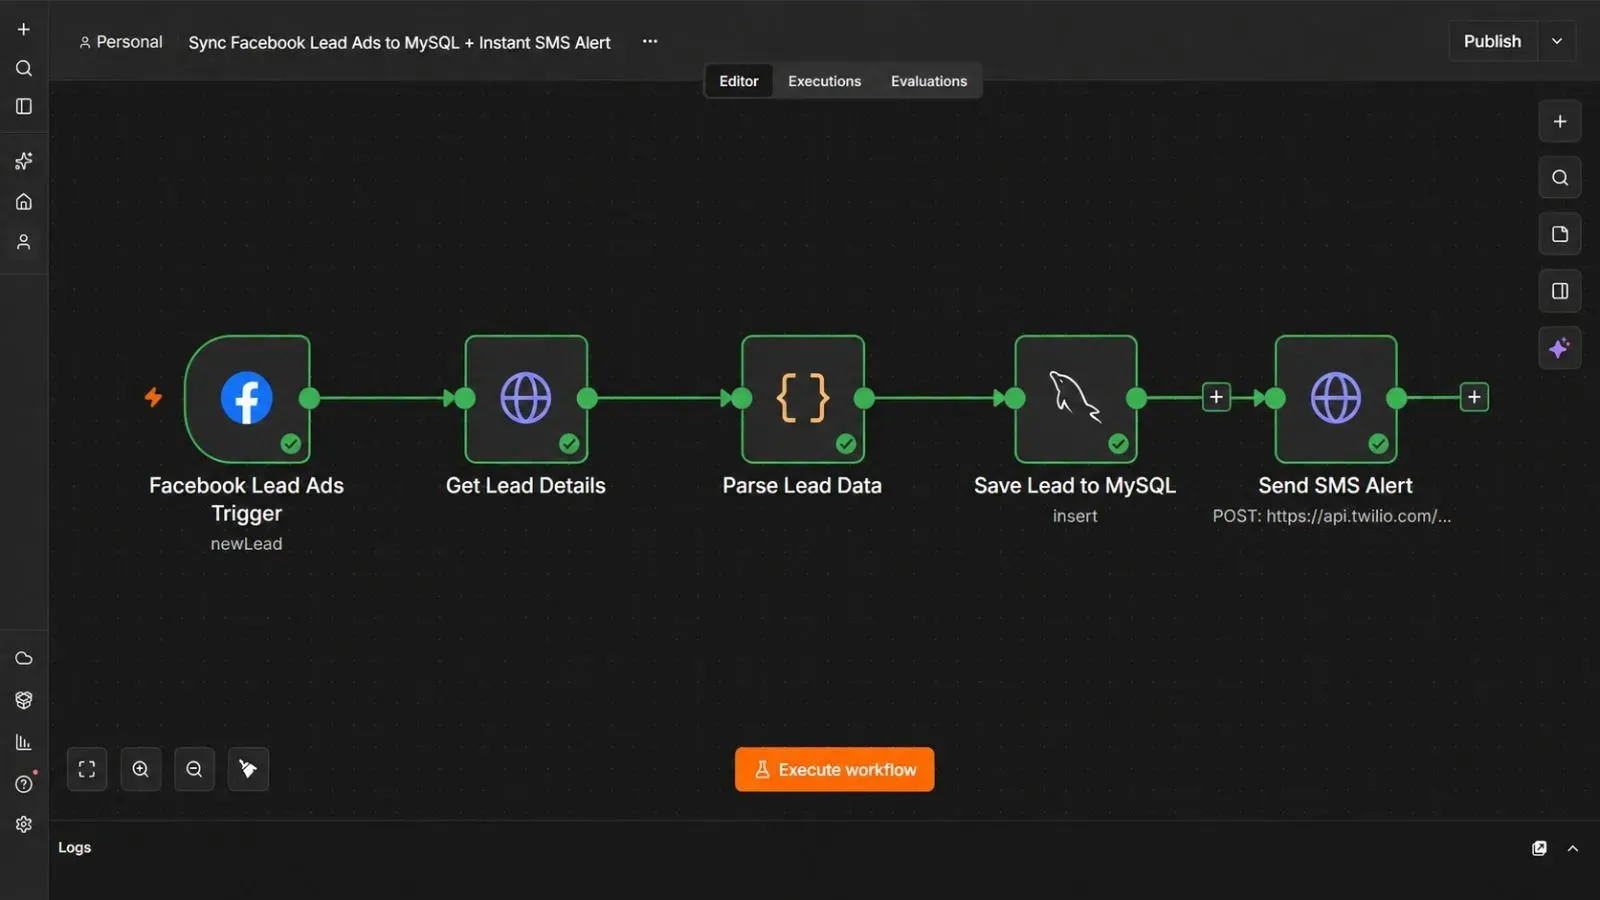
What You'll Need Before You Start
| Requirement | What it's for | Where to get it |
|---|---|---|
| A Facebook Page with Lead Ads running | The source of your leads | Your existing Facebook Business account |
| A Facebook App (Developer account) | Lets n8n legally read your lead data | developers.facebook.com |
| An n8n instance (Cloud or self-hosted) | Runs the automation | n8n.io |
| A MySQL database | Stores your leads permanently | Your own server, or a managed host like PlanetScale, Amazon RDS, or your hosting provider's database panel |
| An SMS provider account (this guide uses Twilio) | Sends the alert text message | twilio.com |
If any of these are missing, set them up first — trying to build the workflow without them just means stopping halfway through.
Step 1 — Create a Facebook App and Turn On Lead Ads Access
Facebook doesn't let any outside tool read your leads by default. You need to register an "app" that asks for permission first.
- Go to developers.facebook.com and log in with the Facebook account that manages your Page.
- Click My Apps, then Create App.
- Choose Business as the app type, then give it a name like "Lead Sync Automation."
- Once the app is created, open Add Product and add Webhooks and Facebook Login for Business.
- Under App Roles, make sure your account has admin access to the app.
- Go to App Review → Permissions and Features, and request the
leads_retrievalandpages_manage_adspermissions. Facebook requires this review before your app can pull real lead data — for a business using its own Page, this is usually a straightforward approval.
Step 2 — Connect n8n to Your Facebook App
- In n8n, click Credentials in the left sidebar, then New.
- Search for Facebook Lead Ads API and select it.
- Paste in the App ID and App Secret from your Facebook App's dashboard (found under Settings → Basic).
- Follow the on-screen authorization step, which opens a Facebook login window asking you to approve access to your Page.
- Save the credential with a clear name like "Facebook Leads – Main Page."
Step 3 — Add the Facebook Lead Ads Trigger
This is the node that starts the whole workflow the moment someone submits your form.
- Open a new, blank workflow in n8n.
- Click Add first step, search for "Facebook Lead Ads Trigger," and add it.
- Select the credential you created in Step 2.
- Choose your Facebook Page from the dropdown, then choose the specific Lead Ad Form you want to track. If you run several forms, you can duplicate this workflow later for each one.
- Save the workflow so n8n can register the webhook with Facebook in the background.
At this point, the node is listening — but it only receives a lead ID, not the full name/email/phone details yet. Those come next.
Step 4 — Fetch the Full Lead Details
Facebook's trigger only tells n8n "a new lead exists" and gives you an ID. You need a second step to actually go get that lead's answers.
- Click + after the trigger, search for "HTTP Request," and add it.
- Name it "Get Lead Details."
- Set the method to GET.
- Set the URL to Facebook's Graph API endpoint for that lead, using the leadgen ID from the trigger — for example:
https://graph.facebook.com/v19.0/{{ $json.leadgenId }} - Add a query parameter named
access_token, and paste in the Page access token connected to your Facebook App (this stays consistent as long as your app permissions remain approved). - Test the step using a sample lead. You should get back a
field_dataarray containing every question and answer from your form — name, email, phone, and anything custom you added.
Step 5 — Turn the Raw Facebook Data Into Clean Fields
Facebook returns your lead's answers as a list of name/value pairs, not as neat columns. This step turns that list into simple fields your database can actually use.
- Add a Code node, name it "Parse Lead Data."
- Set the language to JavaScript.
- Use logic that loops through the
field_dataarray and pulls out each answer by its question name (full_name,email,phone_number, or whatever your form uses):
const fields = $json.field_data;
const lead = {};

for (const field of fields) {
  lead[field.name] = field.values[0];
}

return {
  json: {
    full_name: lead.full_name || "",
    email: lead.email || "",
    phone_number: lead.phone_number || "",
    submitted_at: new Date().toISOString()
  }
};
Test the step. You should now see a clean, simple object with just the fields you actually need.
(If your form asks different or additional questions, add matching lines to this code using your own field names — check the raw output from Step 4 to see exactly how Facebook labeled each answer.)
Step 6 — Create Your MySQL Leads Table
Before n8n can save anything, your database needs a table ready to receive it.
- Open your MySQL client (phpMyAdmin, TablePlus, MySQL Workbench, or a terminal — whichever you normally use).
- Run this command to create a simple leads table:
CREATE TABLE facebook_leads (
  id INT AUTO_INCREMENT PRIMARY KEY,
  full_name VARCHAR(255),
  email VARCHAR(255),
  phone_number VARCHAR(50),
  submitted_at DATETIME
);
Confirm the table appears in your database before moving forward.
Step 7 — Save the Lead Into MySQL
- Back in n8n, click + after the Parse Lead Data node, search for "MySQL," and add it.
- Create a new MySQL credential with your database's host, port, username, password, and database name (your hosting provider or database dashboard shows these).
- Set the operation to Insert.
- Set the table to
facebook_leads. - Map each column (
full_name,email,phone_number,submitted_at) to the matching field from the previous step. - Test the step, then check your database — the lead should now appear as a new row.
Step 8 — Send an Instant SMS Alert
Now for the part that actually gets someone on the phone fast.
- Click +, search for "HTTP Request," and add it. Name it "Send SMS Alert."
- Set the method to POST.
- Set the URL to Twilio's messages endpoint, replacing
YOUR_ACCOUNT_SIDwith your own:https://api.twilio.com/2010-04-01/Accounts/YOUR_ACCOUNT_SID/Messages.json - Under Authentication, choose Basic Auth, and enter your Twilio Account SID as the username and your Auth Token as the password (both found on your Twilio Console dashboard).
- Turn on Send Body, set it to
form-urlencoded, and add these fields:To→ the phone number that should receive the alert (your sales rep's number)From→ your Twilio phone numberBody→ a short message pulling in the lead's name, for example:New lead: {{ $json.full_name }}, phone {{ $json.phone_number }}. Call now.
- Test the step — a real text message should arrive on the phone number you entered within a few seconds.
Step 9 — Test With a Real Form Submission
Testing with sample data confirms the nodes work, but testing with an actual Facebook form submission confirms the whole chain works end to end.
- Open your live lead form on Facebook (using preview mode if you don't want to spend ad budget).
- Submit it yourself with a real name, email, and phone number.
- Watch the n8n execution log — you should see the trigger fire, followed by each step running in order.
- Check your MySQL table for the new row, and check the target phone for the SMS.
If a step fails, click into it directly — n8n shows exactly which field was missing or incorrect, which is far faster than guessing.
Step 10 — Activate the Workflow
Testing runs don't fire automatically for future leads — you need to switch the workflow on.
- Click the Active toggle in the top right corner of the n8n canvas.
- Confirm it turns green/on.
- Leave the workflow open in the background, or close the tab — once active, n8n keeps listening for new leads even without the editor open.
Your automation now runs on its own, every time someone fills out that form.
The Downloadable Template
A ready-to-import version of this workflow is included below, so you don't need to build every node from scratch. It ships with clearly labeled placeholders for your own credentials and phone numbers.
How to install it:
- Open n8n and start a new, blank workflow.
- Click the three dots menu in the top right corner.
- Select Import from File.
- Choose the downloaded .json file.
- Open each node and connect your own Facebook, MySQL, and Twilio credentials where the placeholders appear.
{
  "name": "Sync Facebook Lead Ads to MySQL + Instant SMS Alert",
  "nodes": [
    {
      "parameters": {
        "page": "YOUR_FACEBOOK_PAGE_ID",
        "form": "YOUR_LEAD_FORM_ID"
      },
      "id": "node-fb-lead-trigger",
      "name": "Facebook Lead Ads Trigger",
      "type": "n8n-nodes-base.facebookLeadAdsTrigger",
      "typeVersion": 1,
      "position": [0, 0],
      "credentials": {
        "facebookLeadAdsApi": {
          "id": "1",
          "name": "Facebook Leads - Main Page"
        }
      }
    },
    {
      "parameters": {
        "method": "GET",
        "url": "={{ 'https://graph.facebook.com/v19.0/' + $json.leadgenId }}",
        "sendQuery": true,
        "queryParameters": {
          "parameters": [
            { "name": "access_token", "value": "YOUR_FACEBOOK_PAGE_ACCESS_TOKEN" }
          ]
        }
      },
      "id": "node-get-lead-details",
      "name": "Get Lead Details",
      "type": "n8n-nodes-base.httpRequest",
      "typeVersion": 4.2,
      "position": [220, 0]
    },
    {
      "parameters": {
        "language": "javaScript",
        "jsCode": "const fields = $json.field_data;\nconst lead = {};\n\nfor (const field of fields) {\n  lead[field.name] = field.values[0];\n}\n\nreturn {\n  json: {\n    full_name: lead.full_name || \"\",\n    email: lead.email || \"\",\n    phone_number: lead.phone_number || \"\",\n    submitted_at: new Date().toISOString()\n  }\n};"
      },
      "id": "node-parse-lead-data",
      "name": "Parse Lead Data",
      "type": "n8n-nodes-base.code",
      "typeVersion": 2,
      "position": [440, 0]
    },
    {
      "parameters": {
        "operation": "insert",
        "table": "facebook_leads",
        "columns": "full_name,email,phone_number,submitted_at",
        "options": {}
      },
      "id": "node-mysql-insert",
      "name": "Save Lead to MySQL",
      "type": "n8n-nodes-base.mySql",
      "typeVersion": 2.4,
      "position": [660, 0],
      "credentials": {
        "mySql": {
          "id": "2",
          "name": "MySQL - Leads Database"
        }
      }
    },
    {
      "parameters": {
        "method": "POST",
        "url": "https://api.twilio.com/2010-04-01/Accounts/YOUR_TWILIO_ACCOUNT_SID/Messages.json",
        "authentication": "genericCredentialType",
        "genericAuthType": "httpBasicAuth",
        "sendBody": true,
        "contentType": "form-urlencoded",
        "bodyParameters": {
          "parameters": [
            { "name": "To", "value": "+15551234567" },
            { "name": "From", "value": "YOUR_TWILIO_PHONE_NUMBER" },
            { "name": "Body", "value": "={{ 'New lead: ' + $json.full_name + ', phone ' + $json.phone_number + '. Call now.' }}" }
          ]
        }
      },
      "id": "node-send-sms",
      "name": "Send SMS Alert",
      "type": "n8n-nodes-base.httpRequest",
      "typeVersion": 4.2,
      "position": [880, 0],
      "credentials": {
        "httpBasicAuth": {
          "id": "3",
          "name": "Twilio Basic Auth"
        }
      }
    }
  ],
  "connections": {
    "Facebook Lead Ads Trigger": {
      "main": [[{ "node": "Get Lead Details", "type": "main", "index": 0 }]]
    },
    "Get Lead Details": {
      "main": [[{ "node": "Parse Lead Data", "type": "main", "index": 0 }]]
    },
    "Parse Lead Data": {
      "main": [
        [
          { "node": "Save Lead to MySQL", "type": "main", "index": 0 },
          { "node": "Send SMS Alert", "type": "main", "index": 0 }
        ]
      ]
    }
  },
  "pinData": {},
  "meta": {
    "instanceId": "facebook-leads-mysql-sms-template"
  }
}
Common Mistakes to Avoid
- Forgetting to request the
leads_retrievalpermission. Without it, Facebook's trigger fires, but the follow-up request for lead details returns an error. - Using an expired Page access token. Facebook tokens can expire — if the "Get Lead Details" step suddenly stops working, this is usually why.
- Mismatched field names. If your form's question names don't match what the Code node expects in Step 5, those columns save as empty. Always check the raw output first.
- Wrong phone number format for SMS. Twilio expects international format (e.g.,
+15551234567), not a local format like0555-123-4567. - Forgetting to activate the workflow. A perfectly working test doesn't mean anything is live — the Active toggle in Step 10 is easy to skip.
Frequently Asked Questions
Not really. Most of this workflow is filling in forms and dropdowns inside n8n. The only actual code is the short JavaScript snippet in Step 5, and it's provided ready to copy in.
n8n processes each trigger event separately, so both leads get their own row in MySQL and their own SMS — nothing gets overwritten.
Yes. Duplicate the "Send SMS Alert" step, or loop through a list of numbers if you want the whole sales team notified at once.
Twilio charges per SMS sent, and depending on your setup, your MySQL host and n8n plan may also have costs. Check each provider's current pricing before running this at high volume.
Yes. Add another step after Step 5 pointing to your CRM's API or n8n integration — the parsed lead data works the same way for both destinations.
Leave a Comment
Your comment is completely private and secure. We never publish comments publicly on our website. Your message will be sent directly to our team.