
An ad campaign sends someone to a landing page, they fill out the form, and then... nothing happens for a while. The submission lands in an inbox nobody's actively watching, or worse, a spreadsheet someone checks once a day if they remember. By the time anyone follows up, the lead has already moved on, or a competitor's automated welcome email beat you to the inbox by six hours.
This guide builds an automation that closes that gap completely. The moment someone submits a form, their details land in your CRM as a real contact, and a welcome email goes out automatically — no one needs to notice the submission happened for any of it to occur.
This guide's specific technical focus is one that trips up a lot of people the first time they connect a custom form to anything: different forms send their data in completely different shapes, and getting that raw, inconsistent data mapped cleanly into your CRM's specific fields is really the whole challenge here.
Every step below is written for someone who has never opened n8n before.
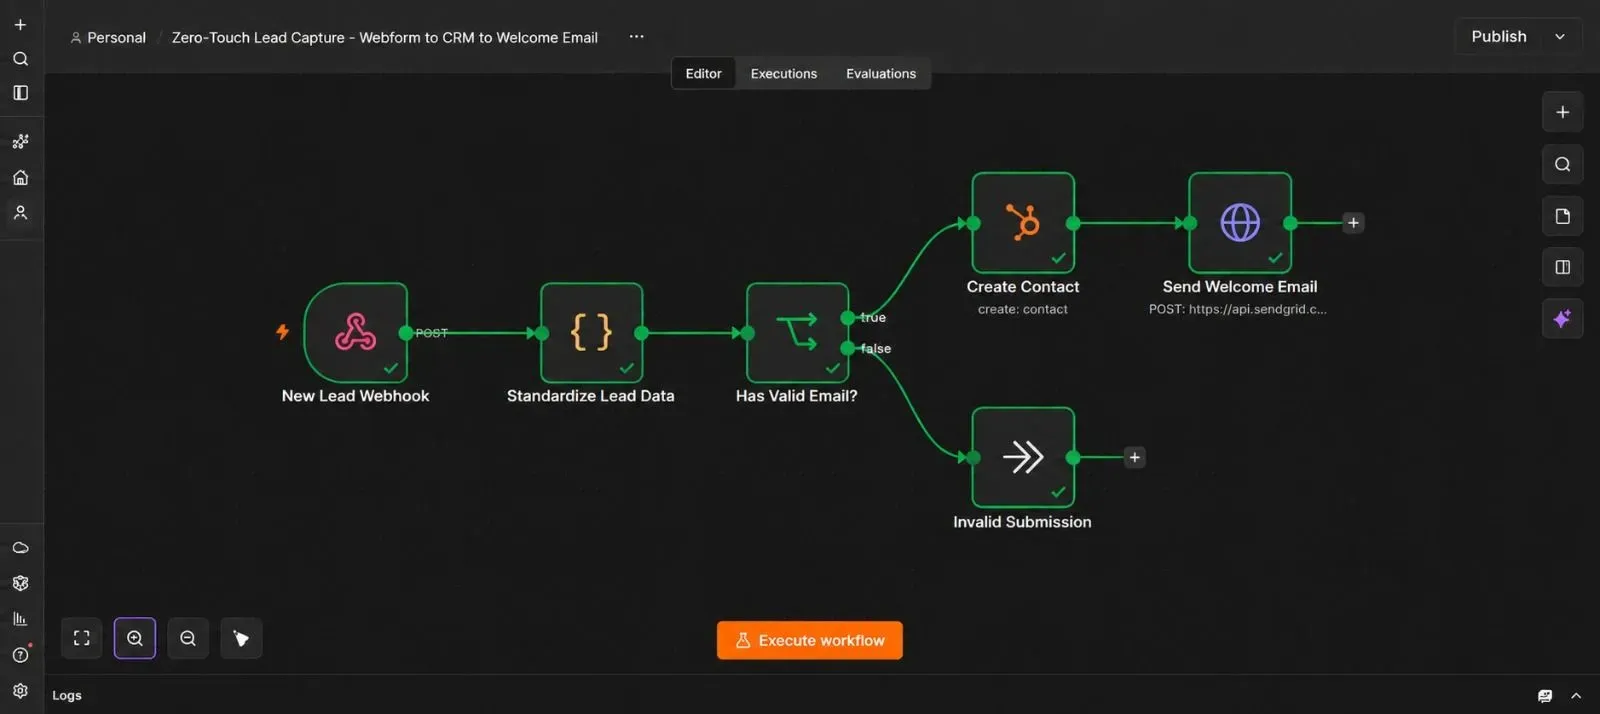
What This Automation Actually Does
Here's the short version before the steps begin:
Someone submits your landing page form → n8n receives the raw submission → n8n cleans and standardizes it into one consistent format, no matter which form or form builder sent it → a new contact gets created in your CRM → a welcome email goes out automatically, addressed using their real name.
What You'll Need Before You Start
| Requirement | What it's for | Where to get it |
|---|---|---|
| A landing page form that can submit data (custom HTML, or a builder like Webflow, Elementor, etc.) | Where leads come from | Your existing site or form builder |
| A HubSpot account (free CRM tier works) | Stores the new contact | hubspot.com |
| A SendGrid account with a Dynamic Template built | Sends the welcome email | sendgrid.com |
| An n8n instance (Cloud or self-hosted) | Runs the automation | n8n.io |
Step 1 — Set Up HubSpot API Access
- In HubSpot, go to Settings → Integrations → Private Apps, and click Create a private app.
- Name it something like "Lead Capture Automation."
- Under Scopes, enable
crm.objects.contacts.readandcrm.objects.contacts.write. - Click Create app, and copy the generated Access Token.
Step 2 — Set Up SendGrid and a Welcome Email Template
- In SendGrid, go to Settings → API Keys, and create a new key with Mail Send permission. Copy it.
- Go to Email API → Dynamic Templates, and create a new template named "Welcome Email."
- Design a simple welcome message, using placeholders like
{{first_name}}where the recipient's name should appear. - Copy the template's Template ID — you'll need it in Step 8.
Step 3 — Add the Webhook Trigger in n8n
- Open a new, blank workflow, click Add first step, search for "Webhook," and add it.
- Set the HTTP Method to POST, and the Path to something recognizable, like
new-lead. - Copy the Production URL shown at the top of the node.
Step 4 — Point Your Form at the Webhook
If you're using a custom HTML form, have its submit action send a JSON POST request to the Production URL from Step 3 — a simple JavaScript fetch() call works fine for this.
If you're using a form builder like Webflow, Elementor, or a similar tool, look for a "Webhook" or "Integrations" setting in that form's configuration, and paste the same Production URL in there instead.
Either way ends up in the same place: your form's raw submission data arriving at this n8n workflow.
Step 5 — See Exactly What Your Form Actually Sends
- Submit a real test entry through your form.
- Click into the Webhook node's execution, and look closely at the raw JSON it received.
💡 This step matters more than it might seem. Every form and form builder structures its data differently — one might send a field called email, another Email Address, another contact_email. Some send a single name field, others split it into first_name and last_name separately. Knowing exactly what your specific form sends is the starting point for the next step.
Step 6 — Why This Guide's Real Focus Is Standardizing the Data
Here's the core problem this guide solves, explained before jumping into the fix.
If every step downstream — the CRM, the email service — had to know exactly how this specific form names its fields, the whole workflow would break the moment you changed form builders, added a second form, or a third-party tool updated its field names without warning. The fix is adding one deliberate step in the middle: take whatever messy, inconsistent data comes in, and convert it into one clean, predictable shape that everything after it can rely on — regardless of where the submission actually came from.
Think of it as a translation layer: no matter what language the form "speaks," everything after this step only ever has to understand one language.
Step 7 — Standardize the Incoming Data
- Click + after the Webhook node, search for "Code," and add it. Name it "Standardize Lead Data."
- Set the language to JavaScript, and use logic that checks several possible field names for each piece of data, falling back gracefully if one isn't present:
const body = $json.body;

const email = body.email || body.Email || body['Email Address'] || body.contact_email || "";
const firstName = body.first_name || body.firstName || body.fname || (body.name ? body.name.split(' ')[0] : "");
const lastName = body.last_name || body.lastName || body.lname || (body.name ? body.name.split(' ').slice(1).join(' ') : "");
const phone = body.phone || body.Phone || body.phone_number || "";
const company = body.company || body.Company || body.organization || "";

return {
  json: {
    email: email.trim().toLowerCase(),
    first_name: firstName.trim(),
    last_name: lastName.trim(),
    phone: phone.trim(),
    company: company.trim()
  }
};
Test the step using your real submission from Step 5, and confirm you get back one clean object with email, first_name, last_name, phone, and company — regardless of what the original field names actually were.
💡 If you ever switch form providers or add a second form later, this is the only step you'd need to update — add the new field name possibilities to the relevant line, and every step after it keeps working exactly as before.
Step 8 — Catch Submissions Missing a Real Email
- Click +, search for "IF," and add it. Name it "Has Valid Email?"
- Add a condition checking that
emailis not empty. - Leave the false branch either unconnected, or connect it to a simple logging step (a Slack message or a spreadsheet row) so incomplete submissions are still visible somewhere instead of silently vanishing.
Without this check, a submission missing an email — from a broken form field, a bot, or a partial submission — could cause an error further down the chain instead of being handled gracefully.
Step 9 — Create the Contact in HubSpot
- After the true output, click +, search for "HubSpot," and add it. Name it "Create Contact."
- Connect your credential using the Access Token from Step 1.
- Set the Resource to Contact, and the Operation to Create.
- Map your standardized fields to HubSpot's own property names:
email→ HubSpot'semailpropertyfirst_name→ HubSpot'sfirstnamepropertylast_name→ HubSpot'slastnamepropertyphone→ HubSpot'sphonepropertycompany→ HubSpot'scompanyproperty
- Test the step, and check your HubSpot contacts list for the new entry.
💡 This is the second half of the mapping principle from Step 6: the standardization step gave you one clean internal format; this step maps that clean format onto whatever specific field names your CRM happens to use. If you ever swapped HubSpot for Salesforce, only this mapping step would need to change — Salesforce's fields use different names and capitalization (Email, FirstName, LastName), but the standardized data feeding into it would stay exactly the same.
Step 10 — Send the Welcome Email
- Click +, search for "HTTP Request," and add it. Name it "Send Welcome Email."
- Set the method to POST, and the URL to
https://api.sendgrid.com/v3/mail/send. - Add an Authorization header set to
Bearerfollowed by your SendGrid API key from Step 2. - Turn on Send Body, set it to JSON, and build a request using your template ID and the standardized lead data:
{
  "personalizations": [
    {
      "to": [{ "email": "{{ $json.email }}" }],
      "dynamic_template_data": {
        "first_name": "{{ $json.first_name }}"
      }
    }
  ],
  "from": { "email": "hello@yourbusiness.com", "name": "Your Business" },
  "template_id": "YOUR_SENDGRID_TEMPLATE_ID"
}
Test the step using your own email address, and confirm the welcome email arrives with your name filled in correctly.
Step 11 — Test the Whole Chain With a Real Submission
- Submit a genuine test entry through your actual landing page form.
- Watch the n8n execution log as it moves through standardizing the data, creating the HubSpot contact, and sending the welcome email.
- Confirm the new contact appears correctly in HubSpot, and that the welcome email arrives promptly.
Step 12 — Activate the Workflow
- Click the Active toggle in the top right corner of the n8n canvas.
- Confirm it switches on.
From here, every new lead gets captured, added to your CRM, and welcomed automatically — with zero manual steps in between.
The Downloadable Template
A ready-to-import version of this workflow is included below, with clearly labeled placeholders for your own API keys and template ID.
How to install it:
- Open n8n and start a new, blank workflow.
- Click the three dots menu in the top right corner.
- Select Import from File.
- Choose the downloaded
.jsonfile. - Connect your own HubSpot and SendGrid credentials, and point your form at the new Webhook URL.
{
  "name": "Zero-Touch Lead Capture - Webform to CRM to Welcome Email",
  "nodes": [
    {
      "parameters": {
        "httpMethod": "POST",
        "path": "new-lead",
        "responseMode": "onReceived",
        "options": {}
      },
      "id": "node-webhook",
      "name": "New Lead Webhook",
      "type": "n8n-nodes-base.webhook",
      "typeVersion": 2,
      "position": [0, 0]
    },
    {
      "parameters": {
        "language": "javaScript",
        "jsCode": "const body = $json.body;\n\nconst email = body.email || body.Email || body['Email Address'] || body.contact_email || \"\";\nconst firstName = body.first_name || body.firstName || body.fname || (body.name ? body.name.split(' ')[0] : \"\");\nconst lastName = body.last_name || body.lastName || body.lname || (body.name ? body.name.split(' ').slice(1).join(' ') : \"\");\nconst phone = body.phone || body.Phone || body.phone_number || \"\";\nconst company = body.company || body.Company || body.organization || \"\";\n\nreturn {\n  json: {\n    email: email.trim().toLowerCase(),\n    first_name: firstName.trim(),\n    last_name: lastName.trim(),\n    phone: phone.trim(),\n    company: company.trim()\n  }\n};"
      },
      "id": "node-standardize",
      "name": "Standardize Lead Data",
      "type": "n8n-nodes-base.code",
      "typeVersion": 2,
      "position": [220, 0]
    },
    {
      "parameters": {
        "conditions": {
          "conditions": [
            { "leftValue": "={{ $json.email }}", "rightValue": "", "operator": { "type": "string", "operation": "notEmpty" } }
          ]
        }
      },
      "id": "node-if-valid-email",
      "name": "Has Valid Email?",
      "type": "n8n-nodes-base.if",
      "typeVersion": 2.2,
      "position": [440, 0]
    },
    {
      "parameters": {
        "resource": "contact",
        "operation": "create",
        "additionalFields": {
          "email": "={{ $json.email }}",
          "firstname": "={{ $json.first_name }}",
          "lastname": "={{ $json.last_name }}",
          "phone": "={{ $json.phone }}",
          "company": "={{ $json.company }}"
        }
      },
      "id": "node-create-contact",
      "name": "Create Contact",
      "type": "n8n-nodes-base.hubspot",
      "typeVersion": 2.1,
      "position": [660, -100],
      "credentials": {
        "hubspotApi": { "id": "1", "name": "Lead Capture HubSpot" }
      }
    },
    {
      "parameters": {
        "method": "POST",
        "url": "https://api.sendgrid.com/v3/mail/send",
        "sendHeaders": true,
        "headerParameters": {
          "parameters": [
            { "name": "Authorization", "value": "Bearer YOUR_SENDGRID_API_KEY" },
            { "name": "Content-Type", "value": "application/json" }
          ]
        },
        "sendBody": true,
        "specifyBody": "json",
        "jsonBody": "={{ JSON.stringify({\n  personalizations: [\n    {\n      to: [{ email: $json.email }],\n      dynamic_template_data: {\n        first_name: $json.first_name\n      }\n    }\n  ],\n  from: { email: \"hello@yourbusiness.com\", name: \"Your Business\" },\n  template_id: \"YOUR_SENDGRID_TEMPLATE_ID\"\n}) }}"
      },
      "id": "node-send-welcome-email",
      "name": "Send Welcome Email",
      "type": "n8n-nodes-base.httpRequest",
      "typeVersion": 4.2,
      "position": [880, -100]
    },
    {
      "parameters": {},
      "id": "node-invalid-submission",
      "name": "Invalid Submission",
      "type": "n8n-nodes-base.noOp",
      "typeVersion": 1,
      "position": [660, 140]
    }
  ],
  "connections": {
    "New Lead Webhook": {
      "main": [[{ "node": "Standardize Lead Data", "type": "main", "index": 0 }]]
    },
    "Standardize Lead Data": {
      "main": [[{ "node": "Has Valid Email?", "type": "main", "index": 0 }]]
    },
    "Has Valid Email?": {
      "main": [
        [{ "node": "Create Contact", "type": "main", "index": 0 }],
        [{ "node": "Invalid Submission", "type": "main", "index": 0 }]
      ]
    },
    "Create Contact": {
      "main": [[{ "node": "Send Welcome Email", "type": "main", "index": 0 }]]
    }
  },
  "pinData": {},
  "meta": {
    "instanceId": "zero-touch-lead-capture-template"
  }
}
Common Mistakes to Avoid
- Skipping the standardization step because "the form only sends one format right now." The moment a second form, a form redesign, or a new form builder enters the picture, everything downstream that assumed one fixed format breaks at once.
- Not checking for a missing or malformed email before creating the CRM contact. A blank or invalid email can cause the CRM step to fail outright instead of failing gracefully.
- Hardcoding a CRM's exact field names into the standardization step. Keep those two concerns separate — Step 7 should only ever produce your own clean internal format; Step 9 is where CRM-specific field names belong.
- Not testing what happens with a duplicate email. Submitting the same email twice may either update the existing HubSpot contact or return an error, depending on your HubSpot settings — worth testing deliberately rather than discovering the behavior by accident later.
- Forgetting to update the
fromemail address in the SendGrid request. Left as a placeholder, the welcome email will either fail to send or arrive looking clearly unfinished.
Frequently Asked Questions
Yes. As explained in Step 9, only the final mapping step needs to change — swap the HubSpot node for a Salesforce node (or Mailchimp for SendGrid), and map the same standardized fields to that platform's specific field names instead.
This depends on your CRM's own duplicate-handling behavior. HubSpot typically updates the existing contact by matching on email rather than creating a second one, but it's worth testing this directly with your own account settings.
Yes. Add more field-name possibilities to the Code node in Step 7 for whatever additional data your form collects, and map those new fields into your CRM step as well.
Both offer functional free tiers suitable for testing and lower-volume use — check each provider's current plan limits if you expect high submission volume.
The Webhook node in n8n can typically parse either format automatically, so the raw data would still show up under $json.body the same way — just double-check the actual field structure in Step 5 to confirm.
Leave a Comment
Your comment is completely private and secure. We never publish comments publicly on our website. Your message will be sent directly to our team.