
A creator finishes editing a short video, uploads it to TikTok, and then spends the next fifteen minutes doing it all over again — re-uploading to YouTube Shorts, re-typing the caption for Instagram, re-adding hashtags for each platform's audience. Multiply that by every video, every week, and the actual editing stops being the time-consuming part.
This guide builds an automation that removes that repetition. Drop one finished video into a folder, and n8n publishes it to all three platforms on its own, with a properly formatted caption for each one.
Fair warning before starting: this is the most involved workflow in this series, because it requires setting up developer access with three separate companies, each with its own approval process and its own way of accepting a video file. This guide's specific technical focus covers exactly that — how n8n handles a video file as it moves through the workflow, and how to set up the credentials each platform actually requires.
Every step below is written for someone who has never opened n8n before, but budget real time for the credential setup sections — they involve waiting on external approvals that are outside your or n8n's control.
What This Automation Actually Does
Here's the short version before the steps begin:
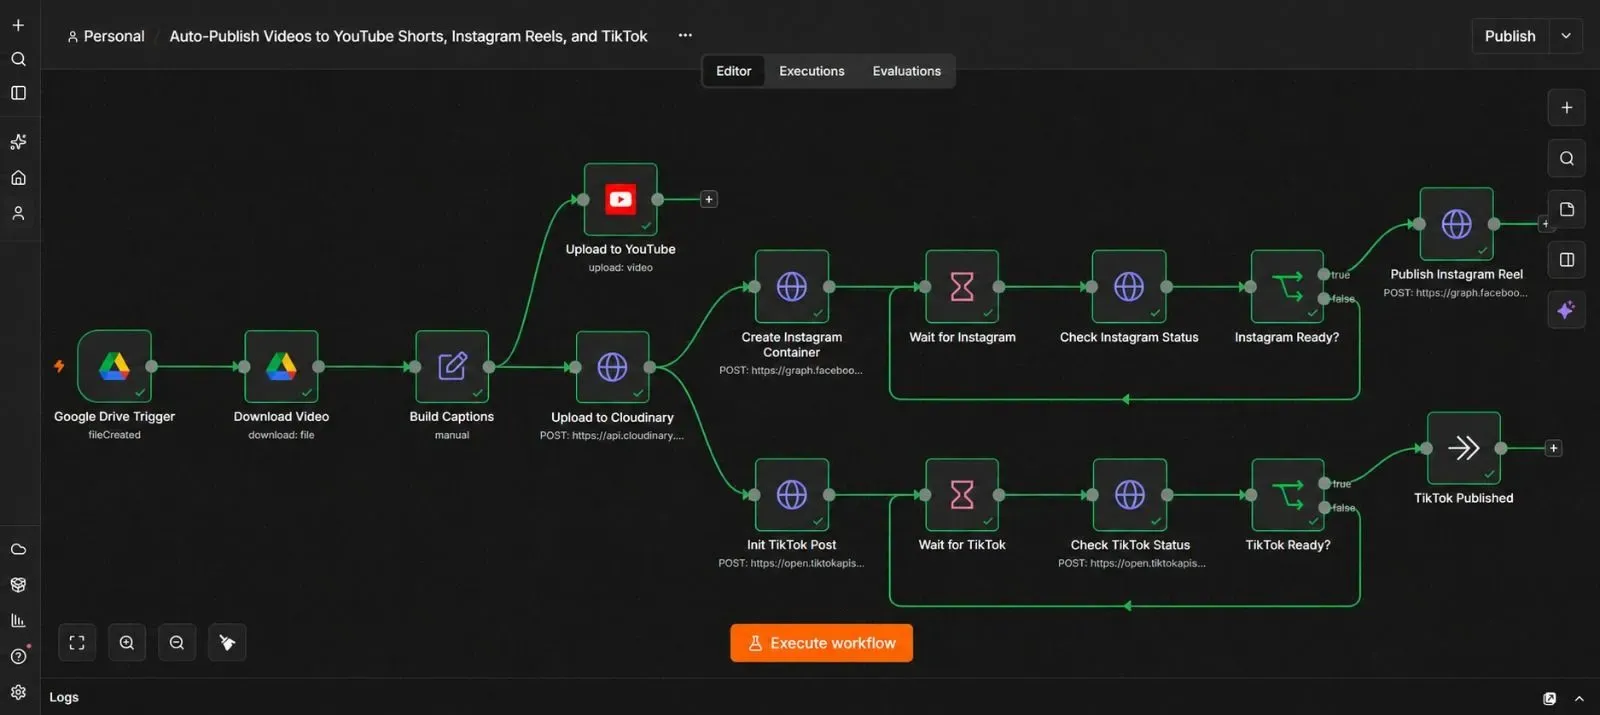
A finished video file gets uploaded to a Google Drive folder → n8n notices the new file → n8n downloads it → n8n builds a properly formatted caption for each platform → the video gets uploaded directly to YouTube → the video also gets hosted at a public link and handed to Instagram and TikTok, which each fetch and publish it from that link.
Notice that last part uses two different methods. That's intentional, and it's the whole reason this guide has a dedicated section on video file handling below.
Why Video Files Don't Travel the Same Way to Every Platform
This is the core lesson of this guide, so it's worth understanding clearly before touching any settings.
When n8n downloads your video, it holds onto that file as binary data — the actual raw bytes of the video, temporarily sitting inside the workflow. What happens next depends entirely on what each platform's API expects:
- YouTube's API accepts the raw video file directly. n8n can hand over those actual bytes, and YouTube receives and processes the file itself. This is the more straightforward option, and it's why this guide uses n8n's built-in YouTube node instead of a manual HTTP request — the node already knows how to send binary video data correctly.
- Instagram and TikTok's publishing APIs work differently. Instead of accepting an uploaded file, both expect you to give them a public web address where the video already lives, and their own servers go fetch it from there. This means before either platform can publish anything, your video needs to be hosted somewhere public and reachable — this guide uses Cloudinary for that, the same free file-hosting service used elsewhere in this series.
Trying to send Instagram or TikTok raw binary data the way YouTube accepts it simply won't work — their publishing endpoints are built around fetching a link, not receiving an upload. Understanding this difference up front avoids a lot of confused troubleshooting later.
What You'll Need Before You Start
| Requirement | What it's for | Where to get it |
|---|---|---|
| A Google Drive folder for finished videos | Where you drop new videos to publish | Your existing Google Drive account |
| A Google Cloud project with YouTube Data API access | Lets n8n upload directly to YouTube | console.cloud.google.com |
| A Meta Developer app connected to an Instagram Professional account | Lets n8n publish to Instagram Reels | developers.facebook.com |
| A TikTok Developer account with Content Posting API access | Lets n8n publish to TikTok | developers.tiktok.com |
| A free Cloudinary account | Hosts the video at a public link for Instagram and TikTok to fetch | cloudinary.com |
| An n8n instance (Cloud or self-hosted) | Runs the automation | n8n.io |
Step 1 — Create Your Source Folder
- In Google Drive, create a folder named something like "Ready to Publish."
- Copy its folder ID from the browser's address bar (the string after
/folders/).
Step 2 — Set Up YouTube API Access
- Go to console.cloud.google.com, and create a new project (or select an existing one).
- Go to APIs & Services → Library, search for YouTube Data API v3, and click Enable.
- Go to APIs & Services → Credentials, click Create Credentials → OAuth client ID, and configure the consent screen if prompted.
- Choose Web application, and add n8n's OAuth redirect URL (n8n shows you this exact URL when you create the credential in the next step).
- Copy the Client ID and Client Secret.
- In n8n, go to Credentials → New, search for YouTube OAuth2 API, paste in your Client ID and Secret, and complete the sign-in flow.
💡 A quota note worth knowing upfront: YouTube's API gives most projects a limited daily quota, and a single video upload uses a meaningful chunk of it — so this works well for a handful of videos a day, but very high-volume posting may need a quota increase request through Google.
Step 3 — Set Up Instagram Graph API Access
- Make sure the Instagram account you're publishing to is set to Professional (Business or Creator), and is connected to a Facebook Page — Instagram's publishing API requires this connection to exist.
- Go to developers.facebook.com, create a new app (type: Business), and add the Instagram Graph API product to it.
- Under App Roles, add yourself so you can generate tokens for testing your own account without needing Meta's full app review process — that review is only required if other people's accounts will use your app, not for publishing to your own.
- Use the Graph API Explorer tool (also on developers.facebook.com) to generate a long-lived access token with the
instagram_content_publish,pages_show_list, andinstagram_basicpermissions. - Find your Instagram Business Account ID — the Graph API Explorer can look this up by querying your connected Facebook Page.
- Save your access token and Instagram Business Account ID somewhere safe — you'll paste both into an HTTP Request node later.
Step 4 — Set Up TikTok Content Posting API Access
- Go to developers.tiktok.com, create a developer account, and register a new app.
- Under your app's products, request access to the Content Posting API. This may involve a brief review from TikTok before it's approved for your account.
- TikTok's URL-based publishing method requires domain verification — proving you own the domain your video will be hosted on. Since this guide hosts videos on Cloudinary's shared domain rather than your own, check TikTok's current documentation for how they handle this case, as their verification requirements do get updated.
- Once approved, copy your Client Key and Client Secret, and complete TikTok's OAuth2 authorization flow to get an access token with the
video.publishscope.
Step 5 — Set Up a Cloudinary Account
- Go to cloudinary.com and create a free account.
- From your dashboard, copy your Cloud name.
- Go to Settings → Upload, and create an unsigned upload preset (the same approach used elsewhere in this series for hosting files without extra signing steps).
Step 6 — Add the Google Drive Trigger
- In n8n, open a new blank workflow, click Add first step, search for "Google Drive Trigger," and add it.
- Connect your Google Drive credential.
- Set the trigger event to File Created, and set the Watch Folder to the folder from Step 1.
Step 7 — Download the Video File
- Click +, search for "Google Drive," and add it. Name it "Download Video."
- Set the Operation to Download.
- Test the step, and check the Binary tab to confirm the video file downloaded correctly.
Step 8 — Build a Formatted Caption for Each Platform
- Add a Set node, name it "Build Captions."
- Create three fields —
youtube_caption,instagram_caption, andtiktok_caption— each combining the video's file name (or a manually written base caption) with platform-appropriate hashtags. For example:youtube_caption→{{ $json.name }} #Shorts #shortinstagram_caption→{{ $json.name }} #Reels #reelsinstagramtiktok_caption→{{ $json.name }} #fyp #tiktok
- Adjust the hashtags and wording to fit your own content — this step just needs to exist somewhere before publishing, so each platform gets text that actually fits its audience instead of one generic caption everywhere.
Step 9 — Upload Directly to YouTube
- Click +, search for "YouTube," and add it. Name it "Upload to YouTube."
- Connect your credential from Step 2.
- Set the Resource to Video, and the Operation to Upload.
- Set the Binary Property to the video file from Step 7 — this is the direct-upload method described earlier, so no file conversion is needed here.
- Set the Title and Description using your
youtube_captionfield. - Make sure the source video is vertical and under YouTube's current Shorts length limit, and that the title or description includes
#Shorts— this is what tells YouTube to treat it as a Short rather than a regular upload. - Test the step, and confirm the video appears on your YouTube channel.
Step 10 — Host the Video Publicly for Instagram and TikTok
- Click +, search for "HTTP Request," and add it. Name it "Upload to Cloudinary."
- Set the method to POST, and the URL to
https://api.cloudinary.com/v1_1/YOUR_CLOUD_NAME/video/upload. - Turn on Send Body, set the content type to form-urlencoded, and add:
file→ the video's binary dataupload_preset→ your unsigned preset name from Step 5
- Test the step, and copy the
secure_urlfield from the response — this is the public link Instagram and TikTok will fetch the video from.
Step 11 — Publish to Instagram Reels
Instagram's publishing process happens in three parts: create a container, wait for it to finish processing, then publish it.
- Add an HTTP Request node, name it "Create Instagram Container." Set it to POST
https://graph.facebook.com/v19.0/YOUR_IG_BUSINESS_ID/media, with query parametersmedia_type=REELS,video_urlset to your Cloudinary link,captionset to yourinstagram_caption, andaccess_tokenset to your token from Step 3. Test it — you'll get back a container ID. - Add a Wait node set to about 30 seconds, since Instagram needs time to process the video before it can be published.
- Add another HTTP Request node, name it "Check Instagram Status." Set it to GET
https://graph.facebook.com/v19.0/YOUR_CONTAINER_ID?fields=status_code&access_token=YOUR_TOKEN. - Add an IF node checking whether
status_codeequalsFINISHED. If not, loop back to the Wait node and check again. If it is, continue forward. - Add a final HTTP Request node, name it "Publish Instagram Reel." Set it to POST
https://graph.facebook.com/v19.0/YOUR_IG_BUSINESS_ID/media_publish, withcreation_idset to your container ID and your access token. - Test the full chain, and confirm the Reel appears on your Instagram account.
Step 12 — Publish to TikTok
TikTok's process follows a similar shape: start the post, then poll until it's finished.
- Add an HTTP Request node, name it "Init TikTok Post." Set it to POST
https://open.tiktokapis.com/v2/post/publish/video/init/, with an Authorization header using your TikTok access token, and a JSON body specifyingsource_infowithsource: "PULL_FROM_URL"and your Cloudinaryvideo_url, pluspost_infocontaining yourtiktok_captionand your chosen privacy setting. Test it — you'll get back a publish ID. - Add a Wait node set to about 30 seconds.
- Add another HTTP Request node, name it "Check TikTok Status," pointed at TikTok's publish status endpoint using the publish ID from step 1.
- Add an IF node checking whether the status shows the post as complete. If not, loop back to the Wait node. If it is, the video is live.
- Test the full chain, and confirm the video appears on your TikTok account.
Step 13 — Test the Entire Workflow With One Real Video
- Drop a short, genuinely vertical test video into your Google Drive folder.
- Watch the n8n execution log as it works through the download, caption building, and all three publishing branches.
- Confirm the video actually appears on YouTube, Instagram, and TikTok, with the correct caption on each.
If one platform fails while the others succeed, that's normal while everything is still being tuned — each branch runs independently, so a TikTok authentication issue, for example, won't stop the YouTube or Instagram branches from completing.
Step 14 — Activate the Workflow
- Click the Active toggle in the top right corner of the n8n canvas.
- Confirm it switches on.
From here, every video dropped into that folder publishes itself across all three platforms automatically.
The Downloadable Template
A ready-to-import version of this workflow is included below, with clearly labeled placeholders for every credential, ID, and access token this guide covers.
How to install it:
- Open n8n and start a new, blank workflow.
- Click the three dots menu in the top right corner.
- Select Import from File.
- Choose the downloaded
.jsonfile. - Open each node and connect your own YouTube, Instagram, TikTok, and Cloudinary credentials where the placeholders appear.
{
  "name": "Auto-Publish Videos to YouTube Shorts, Instagram Reels, and TikTok",
  "nodes": [
    {
      "parameters": {
        "triggerOn": "specificFolder",
        "folderToWatch": { "__rl": true, "value": "YOUR_GOOGLE_DRIVE_FOLDER_ID", "mode": "id" },
        "event": "fileCreated",
        "pollTimes": { "item": [{ "mode": "everyMinute" }] }
      },
      "id": "node-drive-trigger",
      "name": "Google Drive Trigger",
      "type": "n8n-nodes-base.googleDriveTrigger",
      "typeVersion": 1,
      "position": [0, 0],
      "credentials": {
        "googleDriveOAuth2Api": { "id": "1", "name": "Ready to Publish Drive" }
      }
    },
    {
      "parameters": {
        "operation": "download",
        "fileId": { "__rl": true, "value": "={{ $json.id }}", "mode": "id" }
      },
      "id": "node-download-video",
      "name": "Download Video",
      "type": "n8n-nodes-base.googleDrive",
      "typeVersion": 3,
      "position": [220, 0],
      "credentials": {
        "googleDriveOAuth2Api": { "id": "1", "name": "Ready to Publish Drive" }
      }
    },
    {
      "parameters": {
        "assignments": {
          "assignments": [
            { "id": "c1", "name": "youtube_caption", "value": "={{ $json.name + ' #Shorts #short' }}", "type": "string" },
            { "id": "c2", "name": "instagram_caption", "value": "={{ $json.name + ' #Reels #reelsinstagram' }}", "type": "string" },
            { "id": "c3", "name": "tiktok_caption", "value": "={{ $json.name + ' #fyp #tiktok' }}", "type": "string" }
          ]
        },
        "options": {}
      },
      "id": "node-build-captions",
      "name": "Build Captions",
      "type": "n8n-nodes-base.set",
      "typeVersion": 3.4,
      "position": [440, 0]
    },
    {
      "parameters": {
        "resource": "video",
        "operation": "upload",
        "title": "={{ $json.youtube_caption }}",
        "regionCode": "US",
        "categoryId": "22",
        "options": {
          "description": "={{ $json.youtube_caption }}"
        },
        "binaryPropertyName": "data"
      },
      "id": "node-upload-youtube",
      "name": "Upload to YouTube",
      "type": "n8n-nodes-base.youTube",
      "typeVersion": 1,
      "position": [660, -220],
      "credentials": {
        "youTubeOAuth2Api": { "id": "2", "name": "YouTube Publisher" }
      }
    },
    {
      "parameters": {
        "method": "POST",
        "url": "https://api.cloudinary.com/v1_1/YOUR_CLOUD_NAME/video/upload",
        "sendBody": true,
        "contentType": "form-urlencoded",
        "bodyParameters": {
          "parameters": [
            { "name": "file", "parameterType": "formBinaryData", "inputDataFieldName": "data" },
            { "name": "upload_preset", "value": "YOUR_UNSIGNED_UPLOAD_PRESET" }
          ]
        }
      },
      "id": "node-upload-cloudinary",
      "name": "Upload to Cloudinary",
      "type": "n8n-nodes-base.httpRequest",
      "typeVersion": 4.2,
      "position": [660, 0]
    },
    {
      "parameters": {
        "method": "POST",
        "url": "https://graph.facebook.com/v19.0/YOUR_IG_BUSINESS_ID/media",
        "sendQuery": true,
        "queryParameters": {
          "parameters": [
            { "name": "media_type", "value": "REELS" },
            { "name": "video_url", "value": "={{ $json.secure_url }}" },
            { "name": "caption", "value": "={{ $('Build Captions').first().json.instagram_caption }}" },
            { "name": "access_token", "value": "YOUR_INSTAGRAM_ACCESS_TOKEN" }
          ]
        }
      },
      "id": "node-ig-create-container",
      "name": "Create Instagram Container",
      "type": "n8n-nodes-base.httpRequest",
      "typeVersion": 4.2,
      "position": [880, -100]
    },
    {
      "parameters": { "amount": 30, "unit": "seconds" },
      "id": "node-ig-wait",
      "name": "Wait for Instagram",
      "type": "n8n-nodes-base.wait",
      "typeVersion": 1.1,
      "position": [1100, -100]
    },
    {
      "parameters": {
        "method": "GET",
        "url": "={{ 'https://graph.facebook.com/v19.0/' + $('Create Instagram Container').first().json.id }}",
        "sendQuery": true,
        "queryParameters": {
          "parameters": [
            { "name": "fields", "value": "status_code" },
            { "name": "access_token", "value": "YOUR_INSTAGRAM_ACCESS_TOKEN" }
          ]
        }
      },
      "id": "node-ig-check-status",
      "name": "Check Instagram Status",
      "type": "n8n-nodes-base.httpRequest",
      "typeVersion": 4.2,
      "position": [1320, -100]
    },
    {
      "parameters": {
        "conditions": {
          "conditions": [
            { "leftValue": "={{ $json.status_code }}", "rightValue": "FINISHED", "operator": { "type": "string", "operation": "equals" } }
          ]
        }
      },
      "id": "node-ig-if-finished",
      "name": "Instagram Ready?",
      "type": "n8n-nodes-base.if",
      "typeVersion": 2.2,
      "position": [1540, -100]
    },
    {
      "parameters": {
        "method": "POST",
        "url": "https://graph.facebook.com/v19.0/YOUR_IG_BUSINESS_ID/media_publish",
        "sendQuery": true,
        "queryParameters": {
          "parameters": [
            { "name": "creation_id", "value": "={{ $('Create Instagram Container').first().json.id }}" },
            { "name": "access_token", "value": "YOUR_INSTAGRAM_ACCESS_TOKEN" }
          ]
        }
      },
      "id": "node-ig-publish",
      "name": "Publish Instagram Reel",
      "type": "n8n-nodes-base.httpRequest",
      "typeVersion": 4.2,
      "position": [1760, -180]
    },
    {
      "parameters": {
        "method": "POST",
        "url": "https://open.tiktokapis.com/v2/post/publish/video/init/",
        "sendHeaders": true,
        "headerParameters": {
          "parameters": [
            { "name": "Authorization", "value": "Bearer YOUR_TIKTOK_ACCESS_TOKEN" },
            { "name": "Content-Type", "value": "application/json" }
          ]
        },
        "sendBody": true,
        "specifyBody": "json",
        "jsonBody": "={{ JSON.stringify({\n  post_info: {\n    title: $('Build Captions').first().json.tiktok_caption,\n    privacy_level: \"SELF_ONLY\"\n  },\n  source_info: {\n    source: \"PULL_FROM_URL\",\n    video_url: $json.secure_url\n  }\n}) }}"
      },
      "id": "node-tiktok-init",
      "name": "Init TikTok Post",
      "type": "n8n-nodes-base.httpRequest",
      "typeVersion": 4.2,
      "position": [880, 160]
    },
    {
      "parameters": { "amount": 30, "unit": "seconds" },
      "id": "node-tiktok-wait",
      "name": "Wait for TikTok",
      "type": "n8n-nodes-base.wait",
      "typeVersion": 1.1,
      "position": [1100, 160]
    },
    {
      "parameters": {
        "method": "POST",
        "url": "https://open.tiktokapis.com/v2/post/publish/status/fetch/",
        "sendHeaders": true,
        "headerParameters": {
          "parameters": [
            { "name": "Authorization", "value": "Bearer YOUR_TIKTOK_ACCESS_TOKEN" },
            { "name": "Content-Type", "value": "application/json" }
          ]
        },
        "sendBody": true,
        "specifyBody": "json",
        "jsonBody": "={{ JSON.stringify({ publish_id: $('Init TikTok Post').first().json.data.publish_id }) }}"
      },
      "id": "node-tiktok-check-status",
      "name": "Check TikTok Status",
      "type": "n8n-nodes-base.httpRequest",
      "typeVersion": 4.2,
      "position": [1320, 160]
    },
    {
      "parameters": {
        "conditions": {
          "conditions": [
            { "leftValue": "={{ $json.data.status }}", "rightValue": "PUBLISH_COMPLETE", "operator": { "type": "string", "operation": "equals" } }
          ]
        }
      },
      "id": "node-tiktok-if-finished",
      "name": "TikTok Ready?",
      "type": "n8n-nodes-base.if",
      "typeVersion": 2.2,
      "position": [1540, 160]
    },
    {
      "parameters": {},
      "id": "node-tiktok-done",
      "name": "TikTok Published",
      "type": "n8n-nodes-base.noOp",
      "typeVersion": 1,
      "position": [1760, 100]
    }
  ],
  "connections": {
    "Google Drive Trigger": {
      "main": [[{ "node": "Download Video", "type": "main", "index": 0 }]]
    },
    "Download Video": {
      "main": [[{ "node": "Build Captions", "type": "main", "index": 0 }]]
    },
    "Build Captions": {
      "main": [
        [
          { "node": "Upload to YouTube", "type": "main", "index": 0 },
          { "node": "Upload to Cloudinary", "type": "main", "index": 0 }
        ]
      ]
    },
    "Upload to Cloudinary": {
      "main": [
        [
          { "node": "Create Instagram Container", "type": "main", "index": 0 },
          { "node": "Init TikTok Post", "type": "main", "index": 0 }
        ]
      ]
    },
    "Create Instagram Container": {
      "main": [[{ "node": "Wait for Instagram", "type": "main", "index": 0 }]]
    },
    "Wait for Instagram": {
      "main": [[{ "node": "Check Instagram Status", "type": "main", "index": 0 }]]
    },
    "Check Instagram Status": {
      "main": [[{ "node": "Instagram Ready?", "type": "main", "index": 0 }]]
    },
    "Instagram Ready?": {
      "main": [
        [{ "node": "Publish Instagram Reel", "type": "main", "index": 0 }],
        [{ "node": "Wait for Instagram", "type": "main", "index": 0 }]
      ]
    },
    "Init TikTok Post": {
      "main": [[{ "node": "Wait for TikTok", "type": "main", "index": 0 }]]
    },
    "Wait for TikTok": {
      "main": [[{ "node": "Check TikTok Status", "type": "main", "index": 0 }]]
    },
    "Check TikTok Status": {
      "main": [[{ "node": "TikTok Ready?", "type": "main", "index": 0 }]]
    },
    "TikTok Ready?": {
      "main": [
        [{ "node": "TikTok Published", "type": "main", "index": 0 }],
        [{ "node": "Wait for TikTok", "type": "main", "index": 0 }]
      ]
    }
  },
  "pinData": {},
  "meta": {
    "instanceId": "auto-publish-shorts-reels-tiktok-template"
  }
}
Common Mistakes to Avoid
- Trying to send Instagram or TikTok a raw binary file instead of a hosted link. As covered earlier, both platforms fetch the video themselves from a public URL — they don't accept an uploaded file directly the way YouTube does.
- Using a private or sharing-restricted link as the "public" video URL. A Google Drive "anyone with the link" URL often serves a preview page instead of the raw video file — a dedicated hosting service like Cloudinary avoids this problem.
- Skipping the wait-and-check loop for Instagram and TikTok. Publishing immediately after creating the container or init request often fails, because the platform hasn't finished processing the video yet.
- Forgetting that a vertical, short video is required for Shorts and Reels treatment. A horizontal or long-form video may still upload, but it won't be treated as short-form content by any of the three platforms.
- Assuming all three platforms will always succeed together. Since each publishing branch runs independently, it's normal — and worth planning for — that one platform occasionally needs a retry while the others succeed.
Frequently Asked Questions
Not if you're only publishing to your own Instagram account. Full app review is required if you want other people's Instagram accounts to use your app — for personal or single-business use, adding yourself as a developer/tester on your own app is enough.
It's part of how TikTok confirms the video source is legitimate before pulling it from a URL. Check TikTok's current developer documentation for the exact verification steps, since these requirements are updated periodically.
Yes. Facebook Reels publishing works similarly to Instagram's container-based flow, so you could duplicate the Instagram branch and point it at Facebook's equivalent endpoint.
Add error-handling logic to the IF node's loop — for example, stop looping and send yourself a notification after a certain number of failed status checks, rather than looping indefinitely.
YouTube, Instagram, and TikTok's publishing APIs are generally free to use within their quota limits, though Cloudinary's free tier does have its own storage and bandwidth limits worth checking if you're posting at high volume.
Leave a Comment
Your comment is completely private and secure. We never publish comments publicly on our website. Your message will be sent directly to our team.