
You type one sentence — say, "an interesting fact about jellyfish" — and a few minutes later you have a finished, voiced, edited short-form video ready to post on YouTube Shorts, TikTok, or Instagram Reels. No filming, no editing software, no voice actor.
That's what this workflow does. It's built in n8n, a visual automation tool where you connect boxes ("nodes") together instead of writing a full application from scratch. Behind the scenes it chains together several AI services — one to write the script, one to generate the voiceover, one to generate images, one to turn those images into short video clips, and one to edit everything into a final video.
This guide walks through the entire build, node by node, in plain language. If you've never opened n8n before, you should still be able to follow along. At the end, you'll also get a ready-to-import JSON template so you don't have to build every node from scratch.
A note on expectations: this is a multi-service pipeline (five different paid APIs), and getting the style of images and video you want usually takes some trial and error with your prompts — the guide points out exactly where that tweaking happens.
What You'll Need Before You Start
Gather these accounts and API keys first — it'll save you from stopping halfway through.
| Service | What it does in this workflow | Where to get access |
|---|---|---|
| n8n | The automation platform that runs the whole workflow | Self-hosted or n8n Cloud |
| OpenAI | Writes the script and the image prompts | platform.openai.com → API keys |
| ElevenLabs | Converts the script into a spoken voiceover | elevenlabs.io → API keys |
| Replicate | Hosts the image-generation model and the image-to-video model | replicate.com → Account → API tokens |
| Cloudinary | Temporarily hosts your generated audio file so other services can access it by URL | cloudinary.com (free tier works) |
| Creatomate | Automatically edits the final video (stitches clips + audio + captions) | creatomate.com → Project settings → API key |
The Big Picture: How the Pieces Fit Together
Before diving into individual nodes, it helps to see the whole pipeline at a glance:
- You submit an idea (one line of text).
- AI writes a script — an intro, a middle section, and a call-to-action.
- AI turns the script into a voiceover, including word-by-word timing data.
- The script is split into ~6-second chunks using the timing data.
- AI writes an image prompt for each chunk.
- Each prompt generates a still image, then that image is turned into a short animated video clip.
- The voiceover audio is uploaded so the final editor can reach it.
- All the video clips and the audio are combined into one instruction set.
- An automated video editor renders the final video.
- You get back a link to the finished video.
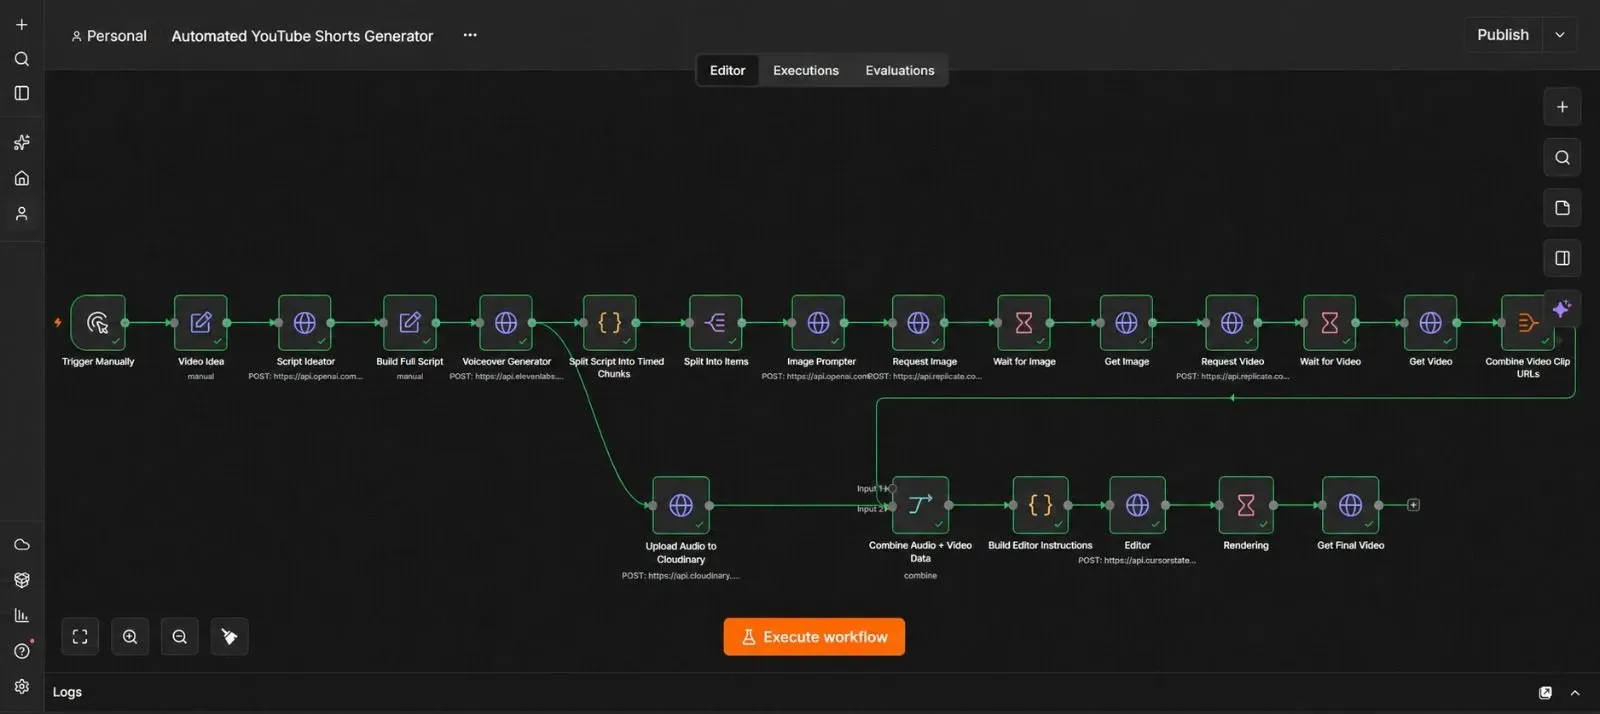
Step 1 — Start With a Trigger
Every n8n workflow needs a starting point.
- Open a new, blank workflow in n8n.
- Click Add first step.
- Search for "Trigger manually" and select it.
This adds a node that lets you start the workflow by clicking a Test workflow button — perfect while you're building and testing. Later, you can swap this for a different trigger (a form submission, a scheduled time, a webhook from another app, etc.) once the workflow is working the way you want.
Step 2 — Set Your Video Idea
Next you need somewhere to type the topic for your video.
- Click the + button after the trigger.
- Search for "Edit Fields (Set)" and add it.
- Create a field — call it something like
user_query. - For its value, type your video topic, e.g. "an interesting fact about jellyfish."
This single field is the only manual input the whole workflow needs. Everything downstream reads from it.
Step 3 — Generate the Script With AI
This is where the video idea becomes an actual script.
- Click +, search "OpenAI," and choose the plain OpenAI node (not "OpenAI Chat Model," which is meant for agent-building — you want the standalone Message a Model action).
- Give it a clear name, like "Script Ideator."
- Connect your OpenAI credential (create one under Credentials → New → OpenAI if you haven't already, using the API key from platform.openai.com).
- Set the model. Use whichever current OpenAI model you have access to — check your OpenAI account for the latest available model name, since these change over time.
- Set the role of the first message to System, and write a prompt instructing the model to act as a video-script writer. Ask it to return structured JSON with three parts: an intro, a middle section, and a closing call-to-action, plus a short title and description.
- Add a second message with the role set to User, and insert your
user_queryfield from Step 2 as the content. - Scroll down and turn on "Output content as JSON" so the response comes back as structured data instead of a paragraph of text.
- Click Test step. You should get back a script broken into its three parts.
Step 4 — Combine the Script Into One Block of Text
The script currently exists as three separate pieces (intro / middle / call-to-action). The voice generator needs it as one continuous block.
- Add another Edit Fields (Set) node.
- Create a field called
script. - Build its value by dragging in the intro, then a space, then the middle section, then a space, then the call-to-action — so they concatenate into one paragraph.
- Test the step to confirm you get back a single, complete script.
Step 5 — Generate the Voiceover With ElevenLabs
Now the script becomes spoken audio — with timing data attached, which you'll need later to sync images to the words being spoken.
- Add an HTTP Request node, name it "Voiceover Generator."
- Set the method to POST.
- Set the URL to ElevenLabs' text-to-speech endpoint for the voice you want to use (you'll get this exact URL, including the voice ID, from the ElevenLabs dashboard — pick a voice under Voices, open it, and copy its ID).
- Turn on Send Headers, add a header named
xi-api-key, and paste in your ElevenLabs API key as the value. - Turn on Send Body, keep it as JSON, and add:
text→ your script field from Step 4, andmodel_id→ the ElevenLabs voice model you want to use. - Look for the option to request character-level timestamps in the response — this is what lets the workflow later figure out exactly which words are being spoken at each moment.
- Test the step. The response will include the audio as a long text string (Base64) plus a detailed timing map of every character.
Step 6 — Split the Script Into Timed Chunks
The image-to-video model used later generates clips in fixed 6-second segments, so the script needs to be sliced into matching 6-second pieces — using the timing data from Step 5 to know exactly where each 6-second boundary falls in the text.
You have two options here:
Option A — n8n's built-in Code node (recommended for most people, no extra account needed).
- Add a Code node.
- Set the language to JavaScript.
- Use logic that reads the character-level timestamps from the previous step, walks through them, and groups characters into ~6-second buckets, saving the start time, end time, and the exact text spoken in each bucket.
const alignment = $json.alignment;
const chars = alignment.characters;
const starts = alignment.character_start_times_seconds;
const ends = alignment.character_end_times_seconds;

const chunkLength = 6; // seconds
const chunks = [];
let currentText = "";
let chunkStart = 0;

for (let i = 0; i < chars.length; i++) {
  currentText += chars[i];
  if (ends[i] - chunkStart >= chunkLength || i === chars.length - 1) {
    chunks.push({
      text: currentText.trim(),
      start: chunkStart,
      end: ends[i]
    });
    currentText = "";
    chunkStart = ends[i];
  }
}

return chunks.map(chunk => ({ json: chunk }));
Option B — a third-party code-execution service (Python). Some creators prefer running this logic in Python through a paid code-execution API instead of n8n's native Code node. It works the same way conceptually — send in the timing data, get back timestamped chunks — but adds another subscription. Option A above avoids that cost and keeps everything inside n8n.
Whichever option you use, test the step and confirm you get back several items, each with a chunk of text and a start/end time.
Step 7 — Split Into Individual Items
Right now your chunks may all be bundled inside one n8n item. The next steps need to process each chunk separately (one image prompt per chunk), so you need to split them out.
- Add a Split Out node.
- Set Field to Split Out to the array of chunks from Step 6.
- Set Include to All Other Fields.
- Test the step — you should now see one separate item per script chunk (commonly four to six items for a typical short).
Step 8 — Write an Image Prompt for Each Chunk
Now each chunk of the script needs a matching image description that an AI image generator can actually draw.
- Add another OpenAI node, name it "Image Prompter."
- Use the same credential and a current text model.
- Write a system prompt telling the model it's an image-prompt generator for video production, and that it should turn each script chunk into a simple, visually concrete description — one that a beginner AI video model can realistically animate. Explicitly tell it to avoid overly complex scenes, since simpler prompts animate far more reliably than busy ones.
- In the user message, pass in the full script (for context) plus the specific chunk being processed right now.
- Turn on Output content as JSON so you get one structured prompt per chunk.
- Test the step. You should get back one image prompt for every chunk from Step 7.
💡 Pro Tip: This is the step where you'll do the most creative tweaking. If the images that come out later don't match the visual style you want, come back here and:
- Add explicit style instructions (e.g., "always shoot as a nighttime scene with neon lighting" or "use wide shots").
- Paste in a few example prompts that already produced results you liked, so the model has something concrete to copy the style from.
This is a normal, iterative part of the process — expect to run the workflow a few times while dialing in the exact look you want, rather than getting it perfect on the first try.
Step 9 — Generate the Images
Each prompt now becomes an actual image, generated through a model hosted on Replicate.
- Add an HTTP Request node named "Request Image."
- Method: POST. URL: Replicate's prediction endpoint.
- Add an Authorization header with the value
Bearerfollowed by your Replicate API token (found under your Replicate profile → API tokens). - Add a Content-Type header set to
application/json. - Add a Prefer header set to
wait, so the request pauses until the image is ready instead of returning immediately. - In the JSON body, include: The specific model version you want to use (found on that model's page on Replicate, under its API tab), your generated prompt from Step 8, the aspect ratio — use a vertical ratio like
9:16so the image fits short-form video dimensions. - Choose a visual style. Replicate hosts many community-trained "LoRA" style models (found by searching model names on Replicate or on Hugging Face). Each style model has its own trigger keyword that needs to appear in your prompt to activate that look — copy that keyword into your Image Prompter's instructions from Step 8.
- Test the step. You'll get back a URL for each generated image.
Step 10 — Wait, Then Retrieve the Images
Image generation isn't always instant, so add a short buffer before fetching the files.
- Add a Wait node set to roughly 10 seconds.
- Add an HTTP Request node named "Get Image," method GET, using the image URL returned in Step 9, with your Replicate authorization header.
- Test the step to confirm the images come back successfully.
Step 11 — Turn Each Image Into a Short Video Clip
Next, each still image becomes a short animated clip, using an image-to-video model (also hosted on Replicate).
- Add an HTTP Request node named "Request Video," method POST, pointed at the image-to-video model's prediction endpoint on Replicate.
- Use the same authorization and content-type headers as before.
- In the body, pass in the image URL from Step 10 as the starting frame.
- Add the
Prefer: waitheader again. - Test the step. Because actual video generation takes longer than an image, this can take anywhere from roughly 2 to 10 minutes depending on load — so don't worry if it looks slow.
💡 Optional improvement: you can add another OpenAI node before this step to write a short motion-description prompt for each clip (e.g., "camera slowly pans left"), which can improve how natural the animation looks. The workflow works fine without this, but it's worth experimenting with.
Step 12 — Wait for Rendering, Then Retrieve Each Video Clip
Even with the "wait" preference set, generation can still be marked as in-progress when the response first comes back, so add a longer buffer here.
- Duplicate your Wait node, rename it "Wait for Video," and set it to around 10 minutes to be safe.
- Duplicate your HTTP Request node, rename it "Get Video," change the method to GET, and point the URL at the specific render ID returned in Step 11.
- Test the step once your Replicate dashboard shows the clips as complete. You should get back a playable video URL for each chunk.
Step 13 — Upload the Voiceover Audio Somewhere Accessible
The video editor in the final steps needs to reach your audio file by URL — it can't use the raw Base64 data from Step 5 directly. That means uploading it somewhere first.
- Go back to the output of Step 5 (the voiceover generator) and branch a new path from it.
- Add an HTTP Request node named "Upload to Cloudinary," method POST, pointed at your Cloudinary upload endpoint (this includes your Cloud name, found on your Cloudinary dashboard).
- Set the body content type to
form-urlencoded. - Add a
filefield containing the Base64 audio from Step 5. - Add an
upload_presetfield. In Cloudinary, go to Settings → Upload → Upload presets, create or edit one, and set it to unsigned for this workflow. Copy that preset name into the field. - Test the step — you should get back a public URL pointing to your uploaded audio file.
Step 14 — Combine Everything Into One Set of Data
At this point you have two separate things: a list of video clip URLs (one per chunk) and one audio file URL. They need to be brought together before the final edit.
- Add an Aggregate node after your video clips branch. Set it to combine all items into a single list, and include the clip URL field so you end up with one tidy array of all your video clip links.
- Add a Merge node. Set the mode to Combine, combining by position, with "include any unpaired items" turned on.
- Connect your aggregated video clips into one input of the Merge node, and your uploaded audio URL (from Step 13) into the other input.
- Test the step to confirm both pieces of data now sit together in one item.
Step 15 — Build the Instructions for the Video Editor
The automated video editor (Creatomate) needs a specific JSON structure telling it which clips go where, in which order, and which audio track to attach.
- Add another Code node, name it "Build Editor Instructions."
- Write logic that takes your merged data from Step 14 and reshapes it into the JSON structure Creatomate expects — essentially a timeline listing each video clip in order, plus the audio track.
- Test the step to confirm you get back a properly structured JSON object.
⚠️ Important: This is the one part of the workflow that depends on the specific structure Creatomate's editor expects — if you change to a different video-editing API, this code will need to be adjusted to match that service's format instead.
Step 16 — Send the Edit Request
- Add an Edit Fields (Set) node to isolate just the JSON code from Step 15, so only clean data moves forward.
- Add an HTTP Request node named "Editor," method POST, pointed at Creatomate's render endpoint.
- Add an Authorization header with
Bearerfollowed by your Creatomate API key (found under Project settings → API key). - Add a Content-Type header set to
application/json. - In the body, add a
sourcefield containing your editor JSON from Step 15. - Test the step. Creatomate will confirm it has started rendering and give you a render ID.
Step 17 — Wait for the Render, Then Get Your Finished Video
- Add a Wait node, roughly 70 seconds, named "Rendering."
- Add a final HTTP Request node named "Get Final Video," method GET, pointed at Creatomate's render-status endpoint using the render ID from Step 16.
- Test the step. Once rendering finishes, the response includes a URL — open it, and you'll have your completed short-form video: script, voiceover, AI-generated visuals, and edited timing, all produced from that single line of text you entered in Step 2.
The Downloadable Template
Building all 17+ nodes by hand is a good way to learn how the pipeline works, but once you understand it, you don't need to repeat the setup every time. A ready-to-import JSON template is included below.
How to install it:
- Open n8n and create a new, blank workflow.
- Click the three dots menu in the top right.
- Select Import from File.
- Choose the downloaded .json template (copy the code below and save it as a `.json` file).
- Open each node that needs a credential or an API key (OpenAI, ElevenLabs, Replicate, Cloudinary, Creatomate) and fill in your own values — the template ships with clearly labeled placeholders like
YOUR_OPENAI_API_KEYso you know exactly what to replace.
{
  "name": "Automated YouTube Shorts Generator",
  "nodes": [
    {
      "parameters": {},
      "id": "node-manual-trigger",
      "name": "Trigger Manually",
      "type": "n8n-nodes-base.manualTrigger",
      "typeVersion": 1,
      "position": [0, 0]
    },
    {
      "parameters": {
        "assignments": {
          "assignments": [
            {
              "id": "assign-user-query",
              "name": "user_query",
              "value": "an interesting fact about jellyfish",
              "type": "string"
            }
          ]
        },
        "options": {}
      },
      "id": "node-set-video-idea",
      "name": "Video Idea",
      "type": "n8n-nodes-base.set",
      "typeVersion": 3.4,
      "position": [220, 0]
    },
    {
      "parameters": {
        "method": "POST",
        "url": "https://api.openai.com/v1/chat/completions",
        "sendHeaders": true,
        "headerParameters": {
          "parameters": [
            { "name": "Authorization", "value": "Bearer YOUR_OPENAI_API_KEY" },
            { "name": "Content-Type", "value": "application/json" }
          ]
        },
        "sendBody": true,
        "specifyBody": "json",
        "jsonBody": "={{ JSON.stringify({\n  model: \"gpt-4o-mini\",\n  response_format: { type: \"json_object\" },\n  messages: [\n    {\n      role: \"system\",\n      content: \"You create short-form video scripts based on the user's topic. Respond ONLY with JSON in this format: {\\\"script\\\": {\\\"intro\\\": \\\"...\\\", \\\"base\\\": \\\"...\\\", \\\"cta\\\": \\\"...\\\"}, \\\"title\\\": \\\"...\\\", \\\"description\\\": \\\"...\\\"}\"\n    },\n    {\n      role: \"user\",\n      content: $json.user_query\n    }\n  ]\n}) }}"
      },
      "id": "node-script-ideator",
      "name": "Script Ideator",
      "type": "n8n-nodes-base.httpRequest",
      "typeVersion": 4.2,
      "position": [440, 0]
    },
    {
      "parameters": {
        "assignments": {
          "assignments": [
            {
              "id": "assign-script",
              "name": "script",
              "value": "={{ JSON.parse($json.choices[0].message.content).script.intro + \" \" + JSON.parse($json.choices[0].message.content).script.base + \" \" + JSON.parse($json.choices[0].message.content).script.cta }}",
              "type": "string"
            }
          ]
        },
        "options": {}
      },
      "id": "node-set-script",
      "name": "Build Full Script",
      "type": "n8n-nodes-base.set",
      "typeVersion": 3.4,
      "position": [660, 0]
    },
    {
      "parameters": {
        "method": "POST",
        "url": "https://api.elevenlabs.io/v1/text-to-speech/YOUR_VOICE_ID/with-timestamps",
        "sendHeaders": true,
        "headerParameters": {
          "parameters": [
            { "name": "xi-api-key", "value": "YOUR_ELEVENLABS_API_KEY" },
            { "name": "Content-Type", "value": "application/json" }
          ]
        },
        "sendBody": true,
        "specifyBody": "json",
        "jsonBody": "={{ JSON.stringify({ text: $json.script, model_id: \"eleven_multilingual_v2\" }) }}"
      },
      "id": "node-voiceover",
      "name": "Voiceover Generator",
      "type": "n8n-nodes-base.httpRequest",
      "typeVersion": 4.2,
      "position": [880, 0]
    },
    {
      "parameters": {
        "language": "javaScript",
        "jsCode": "const alignment = $json.alignment;\nconst chars = alignment.characters;\nconst starts = alignment.character_start_times_seconds;\nconst ends = alignment.character_end_times_seconds;\n\nconst chunkLength = 6; // seconds\nconst chunks = [];\nlet currentText = \"\";\nlet chunkStart = 0;\n\nfor (let i = 0; i < chars.length; i++) {\n  currentText += chars[i];\n  if (ends[i] - chunkStart >= chunkLength || i === chars.length - 1) {\n    chunks.push({\n      text: currentText.trim(),\n      start: chunkStart,\n      end: ends[i]\n    });\n    currentText = \"\";\n    chunkStart = ends[i];\n  }\n}\n\nreturn { json: { chunks, audio_base64: $json.audio_base64 } };"
      },
      "id": "node-chunk-script",
      "name": "Split Script Into Timed Chunks",
      "type": "n8n-nodes-base.code",
      "typeVersion": 2,
      "position": [1100, 0]
    },
    {
      "parameters": {
        "fieldToSplitOut": "chunks",
        "options": { "includeOtherFields": true }
      },
      "id": "node-split-out",
      "name": "Split Into Items",
      "type": "n8n-nodes-base.splitOut",
      "typeVersion": 1,
      "position": [1320, 0]
    },
    {
      "parameters": {
        "method": "POST",
        "url": "https://api.openai.com/v1/chat/completions",
        "sendHeaders": true,
        "headerParameters": {
          "parameters": [
            { "name": "Authorization", "value": "Bearer YOUR_OPENAI_API_KEY" },
            { "name": "Content-Type", "value": "application/json" }
          ]
        },
        "sendBody": true,
        "specifyBody": "json",
        "jsonBody": "={{ JSON.stringify({\n  model: \"gpt-4o-mini\",\n  response_format: { type: \"json_object\" },\n  messages: [\n    {\n      role: \"system\",\n      content: \"You are an image prompt generator for short-form video production. Turn each script segment into one simple, visually concrete image prompt an AI video model can realistically animate. Keep it simple - avoid complex multi-subject scenes. Always include the style keyword: YOUR_STYLE_KEYWORD. Respond ONLY with JSON: {\\\"prompt\\\": \\\"...\\\"}\"\n    },\n    {\n      role: \"user\",\n      content: \"Full script: \" + $('Build Full Script').item.json.script + \"\\n\\nCurrent segment to illustrate: \" + $json.text\n    }\n  ]\n}) }}"
      },
      "id": "node-image-prompter",
      "name": "Image Prompter",
      "type": "n8n-nodes-base.httpRequest",
      "typeVersion": 4.2,
      "position": [1540, 0]
    },
    {
      "parameters": {
        "method": "POST",
        "url": "https://api.replicate.com/v1/predictions",
        "sendHeaders": true,
        "headerParameters": {
          "parameters": [
            { "name": "Authorization", "value": "Bearer YOUR_REPLICATE_API_TOKEN" },
            { "name": "Content-Type", "value": "application/json" },
            { "name": "Prefer", "value": "wait" }
          ]
        },
        "sendBody": true,
        "specifyBody": "json",
        "jsonBody": "={{ JSON.stringify({\n  version: \"YOUR_IMAGE_MODEL_VERSION_ID\",\n  input: {\n    prompt: JSON.parse($json.choices[0].message.content).prompt,\n    aspect_ratio: \"9:16\"\n  }\n}) }}"
      },
      "id": "node-request-image",
      "name": "Request Image",
      "type": "n8n-nodes-base.httpRequest",
      "typeVersion": 4.2,
      "position": [1760, 0]
    },
    {
      "parameters": { "amount": 10, "unit": "seconds" },
      "id": "node-wait-image",
      "name": "Wait for Image",
      "type": "n8n-nodes-base.wait",
      "typeVersion": 1.1,
      "position": [1980, 0]
    },
    {
      "parameters": {
        "method": "GET",
        "url": "={{ $json.urls.get }}",
        "sendHeaders": true,
        "headerParameters": {
          "parameters": [
            { "name": "Authorization", "value": "Bearer YOUR_REPLICATE_API_TOKEN" }
          ]
        }
      },
      "id": "node-get-image",
      "name": "Get Image",
      "type": "n8n-nodes-base.httpRequest",
      "typeVersion": 4.2,
      "position": [2200, 0]
    },
    {
      "parameters": {
        "method": "POST",
        "url": "https://api.replicate.com/v1/predictions",
        "sendHeaders": true,
        "headerParameters": {
          "parameters": [
            { "name": "Authorization", "value": "Bearer YOUR_REPLICATE_API_TOKEN" },
            { "name": "Content-Type", "value": "application/json" },
            { "name": "Prefer", "value": "wait" }
          ]
        },
        "sendBody": true,
        "specifyBody": "json",
        "jsonBody": "={{ JSON.stringify({\n  version: \"YOUR_IMAGE_TO_VIDEO_MODEL_VERSION_ID\",\n  input: {\n    first_frame_image: $json.output[0]\n  }\n}) }}"
      },
      "id": "node-request-video",
      "name": "Request Video",
      "type": "n8n-nodes-base.httpRequest",
      "typeVersion": 4.2,
      "position": [2420, 0]
    },
    {
      "parameters": { "amount": 10, "unit": "minutes" },
      "id": "node-wait-video",
      "name": "Wait for Video",
      "type": "n8n-nodes-base.wait",
      "typeVersion": 1.1,
      "position": [2640, 0]
    },
    {
      "parameters": {
        "method": "GET",
        "url": "={{ $json.urls.get }}",
        "sendHeaders": true,
        "headerParameters": {
          "parameters": [
            { "name": "Authorization", "value": "Bearer YOUR_REPLICATE_API_TOKEN" }
          ]
        }
      },
      "id": "node-get-video",
      "name": "Get Video",
      "type": "n8n-nodes-base.httpRequest",
      "typeVersion": 4.2,
      "position": [2860, 0]
    },
    {
      "parameters": {
        "fieldsToAggregate": {
          "fieldToAggregate": [
            { "fieldToAggregate": "output", "renameField": true, "outputFieldName": "videos" }
          ]
        },
        "options": {}
      },
      "id": "node-aggregate-videos",
      "name": "Combine Video Clip URLs",
      "type": "n8n-nodes-base.aggregate",
      "typeVersion": 1,
      "position": [3080, 0]
    },
    {
      "parameters": {
        "method": "POST",
        "url": "https://api.cloudinary.com/v1_1/YOUR_CLOUD_NAME/video/upload",
        "sendBody": true,
        "contentType": "form-urlencoded",
        "bodyParameters": {
          "parameters": [
            { "name": "file", "value": "={{ 'data:audio/mpeg;base64,' + $('Split Script Into Timed Chunks').first().json.audio_base64 }}" },
            { "name": "upload_preset", "value": "YOUR_UNSIGNED_UPLOAD_PRESET" }
          ]
        }
      },
      "id": "node-upload-cloudinary",
      "name": "Upload Audio to Cloudinary",
      "type": "n8n-nodes-base.httpRequest",
      "typeVersion": 4.2,
      "position": [1100, 260]
    },
    {
      "parameters": {
        "mode": "combine",
        "combineBy": "combineByPosition",
        "options": { "includeUnpaired": true }
      },
      "id": "node-merge",
      "name": "Combine Audio + Video Data",
      "type": "n8n-nodes-base.merge",
      "typeVersion": 3,
      "position": [3300, 130]
    },
    {
      "parameters": {
        "language": "javaScript",
        "jsCode": "// Build the render instructions for the video editor (Creatomate-style structure).\n// Adjust this shape if you use a different video-editing API.\nconst videoUrls = $json.videos;\nconst audioUrl = $json.secure_url;\n\nconst elements = videoUrls.map((url, index) => ({\n  type: \"video\",\n  track: 1,\n  source: url\n}));\n\nelements.push({\n  type: \"audio\",\n  track: 2,\n  source: audioUrl\n});\n\nreturn {\n  json: {\n    output_format: \"mp4\",\n    elements\n  }\n};"
      },
      "id": "node-build-editor-json",
      "name": "Build Editor Instructions",
      "type": "n8n-nodes-base.code",
      "typeVersion": 2,
      "position": [3520, 130]
    },
    {
      "parameters": {
        "method": "POST",
        "url": "https://api.creatomate.com/v1/renders",
        "sendHeaders": true,
        "headerParameters": {
          "parameters": [
            { "name": "Authorization", "value": "Bearer YOUR_CREATOMATE_API_KEY" },
            { "name": "Content-Type", "value": "application/json" }
          ]
        },
        "sendBody": true,
        "specifyBody": "json",
        "jsonBody": "={{ JSON.stringify({ source: $json }) }}"
      },
      "id": "node-editor",
      "name": "Editor",
      "type": "n8n-nodes-base.httpRequest",
      "typeVersion": 4.2,
      "position": [3740, 130]
    },
    {
      "parameters": { "amount": 70, "unit": "seconds" },
      "id": "node-wait-render",
      "name": "Rendering",
      "type": "n8n-nodes-base.wait",
      "typeVersion": 1.1,
      "position": [3960, 130]
    },
    {
      "parameters": {
        "method": "GET",
        "url": "={{ 'https://api.creatomate.com/v1/renders/' + $json[0].id }}",
        "sendHeaders": true,
        "headerParameters": {
          "parameters": [
            { "name": "Authorization", "value": "Bearer YOUR_CREATOMATE_API_KEY" }
          ]
        }
      },
      "id": "node-get-final-video",
      "name": "Get Final Video",
      "type": "n8n-nodes-base.httpRequest",
      "typeVersion": 4.2,
      "position": [4180, 130]
    }
  ],
  "connections": {
    "Trigger Manually": {
      "main": [[{ "node": "Video Idea", "type": "main", "index": 0 }]]
    },
    "Video Idea": {
      "main": [[{ "node": "Script Ideator", "type": "main", "index": 0 }]]
    },
    "Script Ideator": {
      "main": [[{ "node": "Build Full Script", "type": "main", "index": 0 }]]
    },
    "Build Full Script": {
      "main": [[{ "node": "Voiceover Generator", "type": "main", "index": 0 }]]
    },
    "Voiceover Generator": {
      "main": [
        [
          { "node": "Split Script Into Timed Chunks", "type": "main", "index": 0 },
          { "node": "Upload Audio to Cloudinary", "type": "main", "index": 0 }
        ]
      ]
    },
    "Split Script Into Timed Chunks": {
      "main": [[{ "node": "Split Into Items", "type": "main", "index": 0 }]]
    },
    "Split Into Items": {
      "main": [[{ "node": "Image Prompter", "type": "main", "index": 0 }]]
    },
    "Image Prompter": {
      "main": [[{ "node": "Request Image", "type": "main", "index": 0 }]]
    },
    "Request Image": {
      "main": [[{ "node": "Wait for Image", "type": "main", "index": 0 }]]
    },
    "Wait for Image": {
      "main": [[{ "node": "Get Image", "type": "main", "index": 0 }]]
    },
    "Get Image": {
      "main": [[{ "node": "Request Video", "type": "main", "index": 0 }]]
    },
    "Request Video": {
      "main": [[{ "node": "Wait for Video", "type": "main", "index": 0 }]]
    },
    "Wait for Video": {
      "main": [[{ "node": "Get Video", "type": "main", "index": 0 }]]
    },
    "Get Video": {
      "main": [[{ "node": "Combine Video Clip URLs", "type": "main", "index": 0 }]]
    },
    "Combine Video Clip URLs": {
      "main": [[{ "node": "Combine Audio + Video Data", "type": "main", "index": 0 }]]
    },
    "Upload Audio to Cloudinary": {
      "main": [[{ "node": "Combine Audio + Video Data", "type": "main", "index": 1 }]]
    },
    "Combine Audio + Video Data": {
      "main": [[{ "node": "Build Editor Instructions", "type": "main", "index": 0 }]]
    },
    "Build Editor Instructions": {
      "main": [[{ "node": "Editor", "type": "main", "index": 0 }]]
    },
    "Editor": {
      "main": [[{ "node": "Rendering", "type": "main", "index": 0 }]]
    },
    "Rendering": {
      "main": [[{ "node": "Get Final Video", "type": "main", "index": 0 }]]
    }
  },
  "pinData": {},
  "meta": {
    "instanceId": "automated-youtube-shorts-template"
  }
}
Common Mistakes to Avoid
- Forgetting the
Prefer: waitheader on Replicate requests, which causes the workflow to try fetching results before they're actually ready. - Using a generic, vague image prompt ("a person in a kitchen") instead of a concrete one — vague prompts produce inconsistent, low-quality results across your clips.
- Skipping the Wait nodes before fetching images or videos — generation takes real time, and skipping the buffer just produces errors.
- Reusing a signed Cloudinary upload preset instead of an unsigned one — this workflow needs an unsigned preset to upload without extra signing steps.
- Not testing incrementally. Test each node as you build it rather than wiring the whole workflow first and troubleshooting everything at once.
Frequently Asked Questions
It depends on your usage tier with OpenAI, ElevenLabs, Replicate, Cloudinary, and Creatomate — all five have their own pricing, and image/video generation is typically the largest cost. Check each provider's current pricing page before running this at volume.
Not really. Most of the workflow is point-and-click node configuration. The one place with actual code is the timestamp-chunking step, and the JavaScript example in this guide can be copied in as-is.
Yes. Swap the ElevenLabs voice ID for any voice in your ElevenLabs library, and swap the Replicate model/LoRA style for any other image-generation model you prefer.
Turning a still image into an animated clip is more computationally demanding than generating the image itself, so it can take several minutes per clip depending on the model and current server load.
This particular workflow stops at producing the finished video file. Publishing it automatically would require adding an additional step connected to the YouTube API (or another publishing tool), which isn't covered here.
Leave a Comment
Your comment is completely private and secure. We never publish comments publicly on our website. Your message will be sent directly to our team.